Create Orq.ai Deployments to ship LLM use cases to production. Configure model routing, invoke them via API or SDK, and monitor calls in real time.
Deployments are unavailable in workspaces created on or after November 10, 2026. Workspaces created before that date keep their Deployments.
Deployments ship Gen AI use cases to production with Orq.ai as an AI Gateway. All calls route through the platform, providing routing, monitoring, and security in one place. Connect with a single line of code, iterate without a code release, and benefit from full observability throughout.Common use cases include customer support bots, RAG-powered document Q&A, content generation pipelines, and any LLM feature that needs reliable model routing, versioning, and production monitoring.
Create
Set up a Deployment with a key, model, and system prompt in AI Studio or via MCP.
Configure
Set the model, fallbacks, variables, knowledge base, tools, caching, and guardrails per Variant.
Routing
Route traffic across Variants by environment, context attributes, or percentage split.
Versioning
Deploy and roll back configurations without a code release.
Invoke
Call a Deployment via API or SDK and pass identity, usage tracking, and extra parameters.
Analytics
Monitor requests, filter logs by Variant, and inspect full request details.
Create a Deployment
AI Studio
MCP
1
Open the Deployments page
Open Deployments in the Managed Agents section, then click Deployment.
2
Choose Deployment
Select Deployment from the entity picker.
Configure the deployment key and primary model. All settings can be changed later.
3
Configure the initial Variant
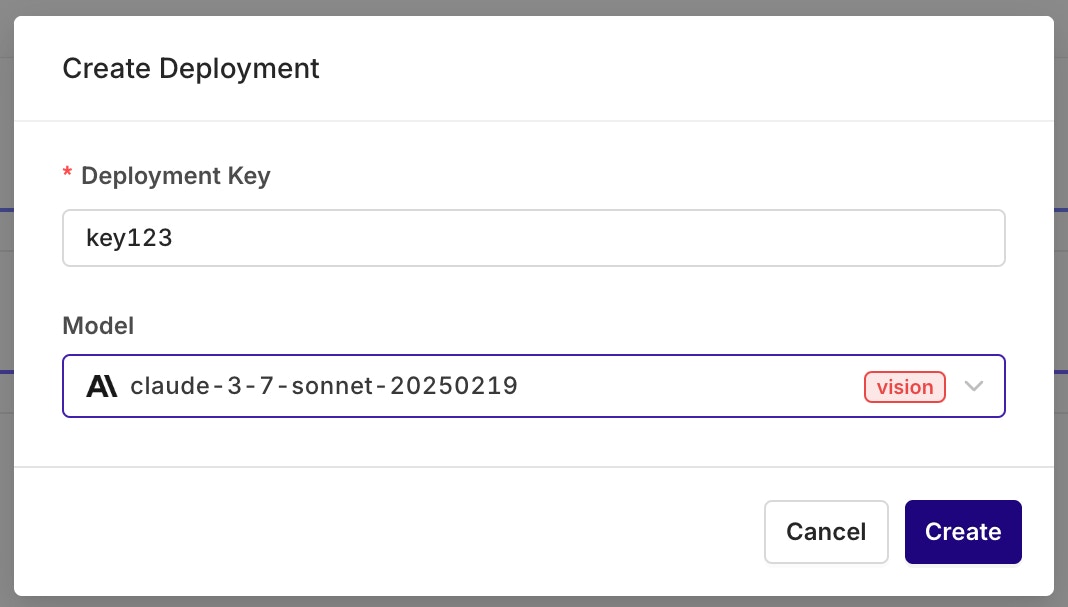
Set the deployment key (alphanumeric) and select the primary model for the first Variant. The Variant editor opens.
Use the Orq MCP server to manage deployments directly from an AI code assistant.Find an existing deployment:
Search for the "support-bot" deployment in my workspace
The assistant uses search_entities with type: "deployment" to locate deployments by name or key.Retrieve deployment configuration:
Get the full configuration of the "support-bot" deployment
The assistant uses get_deployment to return the key, description, model, messages, and variant settings.Create a deployment:
Create a customer support deployment called "support-bot" in the Default/Deployments project. Use GPT-5.6 Sol with a professional, concise system prompt.
The assistant uses create_deployment with the specified key, path, and variant (model and messages). Use list_models first to find valid model IDs.
Configure a Variant
Variants are different prompt and model configurations available behind one Deployment. A Deployment can hold any number of Variants.On creation, the Variant screen opens for model and prompt setup.
A Variant Prompt is similar to any other prompt. To learn how to configure a Prompt, see Creating a Prompt.
Primary Model, Retries, and Fallback
AI Studio
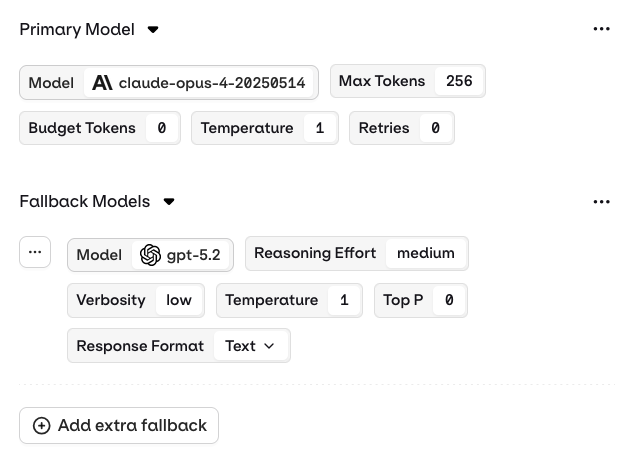
The Primary Model panel defines the first model queried through this Variant.RetriesIn case of failure, configure how many times a query is retried with this model.
Retries are only triggered when a retry count greater than 0 is configured in the Variant settings.When retries are enabled, Orq.ai automatically retries the model provider API call if it returns one of the following HTTP status codes:
408 Request Timeout
429 Rate Limit Exceeded
500 Internal Server Error
502 Bad Gateway
503 Service Unavailable
504 Gateway Timeout
529 Provider Overloaded
Error handling flow:
If an error code above is returned and retries are configured (retry count > 0), Orq.ai retries the Primary Model.
If all retry attempts fail (or no retries are configured) AND a Fallback Model is configured, Orq.ai routes to the Fallback Model.
If the Fallback Model also fails, the error is returned to the calling application.
Fallback ModelThe Fallback Model is triggered only if the Primary Model fails after all configured retries are exhausted. Fallback Models can have a different configuration from the Primary Model.
The Fallback Model configuration is right below the main model configuration. Configure them independently.
Multiple fallback models can be configured in a Deployment. They fall back to one another in order of configuration. Use the Add extra fallback button to declare another model.
See how fallbacks and retries work together in a production system. Read our cookbook Customer Support Chat.
API invocation behaviorWhen invoking a Deployment via the API, response timing depends on the retry and fallback configuration:
Success on first try: Response returned immediately.
Retry scenario: Response may be delayed by up to base_latency × (retry_count + 1) to account for the initial attempt plus all configured retries.
Fallback invoked: Additional latency as the Fallback Model processes the request.
All retries and fallback failed: Error returned to the calling application.
Set appropriate timeouts on API calls to account for retry and fallback latency.
Structured Outputs
AI Studio
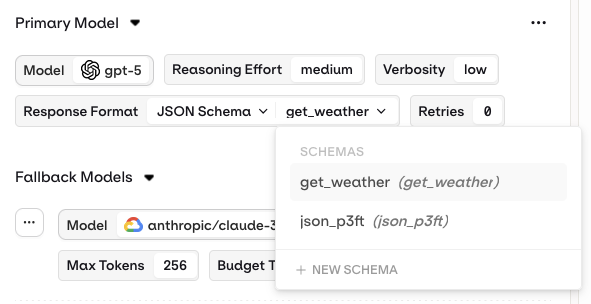
Configure structured outputs to ensure consistent and reliable responses from a Deployment. Structured outputs specify the exact format the model should follow when generating a response.Two modes are available:
JSON Mode: the model automatically returns a valid JSON object for every generation.
JSON Schema: define a schema that explicitly describes the fields, types, and structure of the model output.
Once defined, a schema can be saved to the directory for reuse across multiple variants or deployments.
Set the Response Format to JSON Schema to configure structured output.
Variables and Prompt Templating
AI Studio
API & SDK
CLI
Reference dynamic values in the prompt using double braces: {{variable_name}}. Pass a key-value map to the inputs field when invoking and Orq.ai substitutes each variable before sending the prompt to the model.
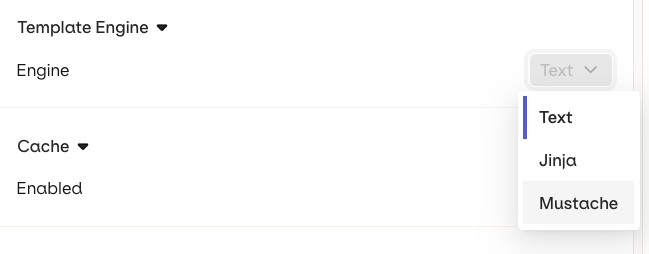
Orq.ai supports three template engines. Select the Template Engine from the Variant Settings panel:
Text (default): variables use {{double_braces}} syntax.
Jinja: full templating with conditionals, loops, filters, and more.
Mustache: logic-less templating with sections.
Select a Template Engine in the Variant Settings panel.
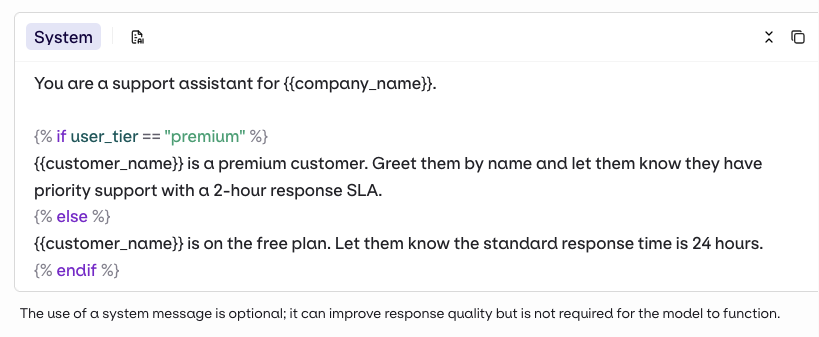
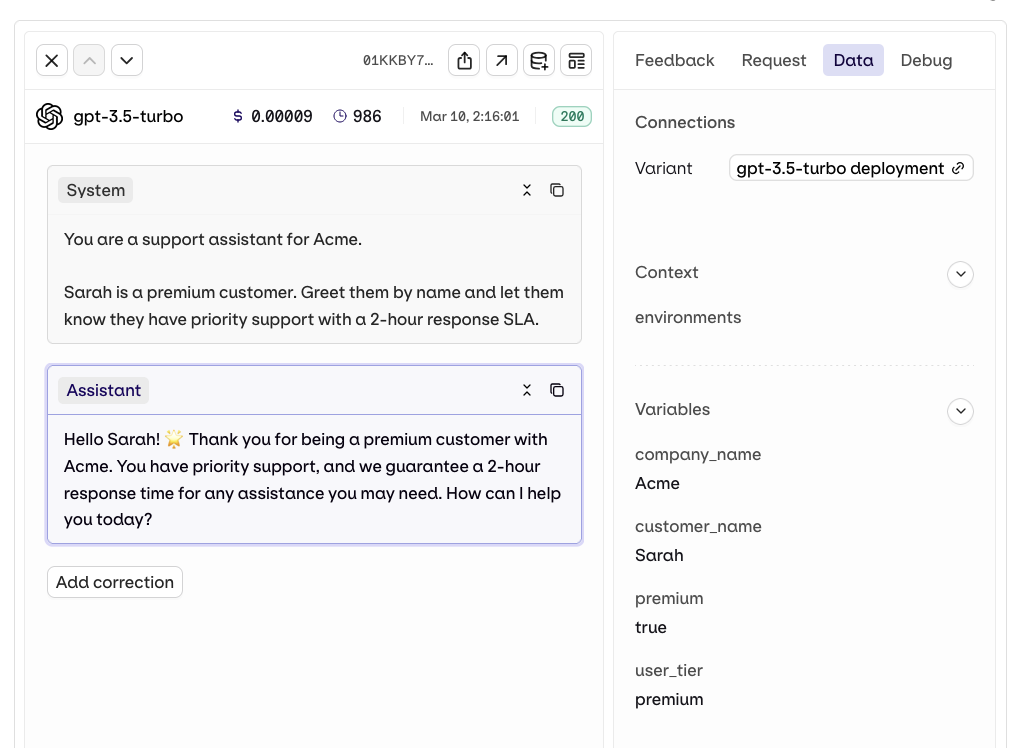
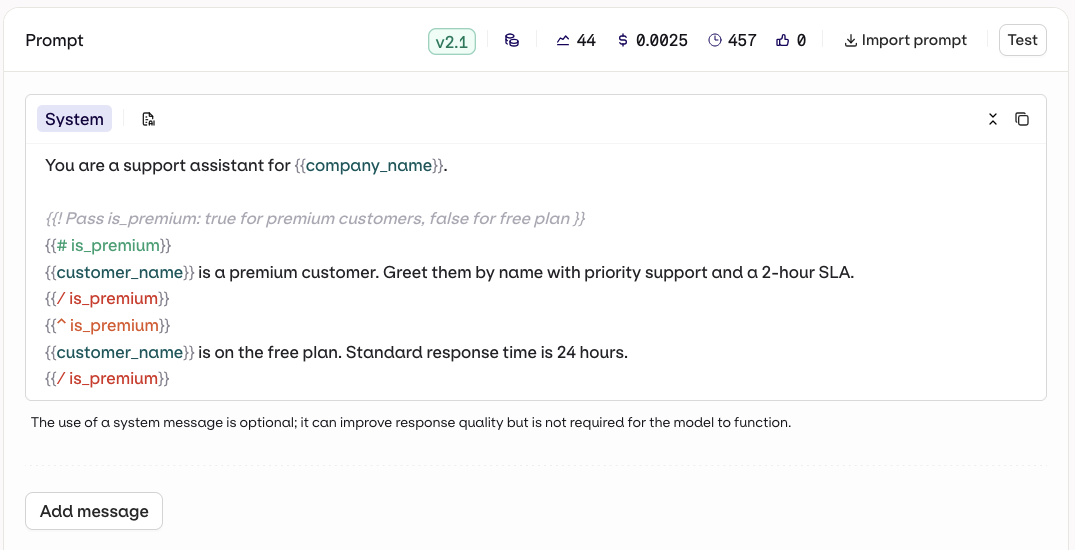
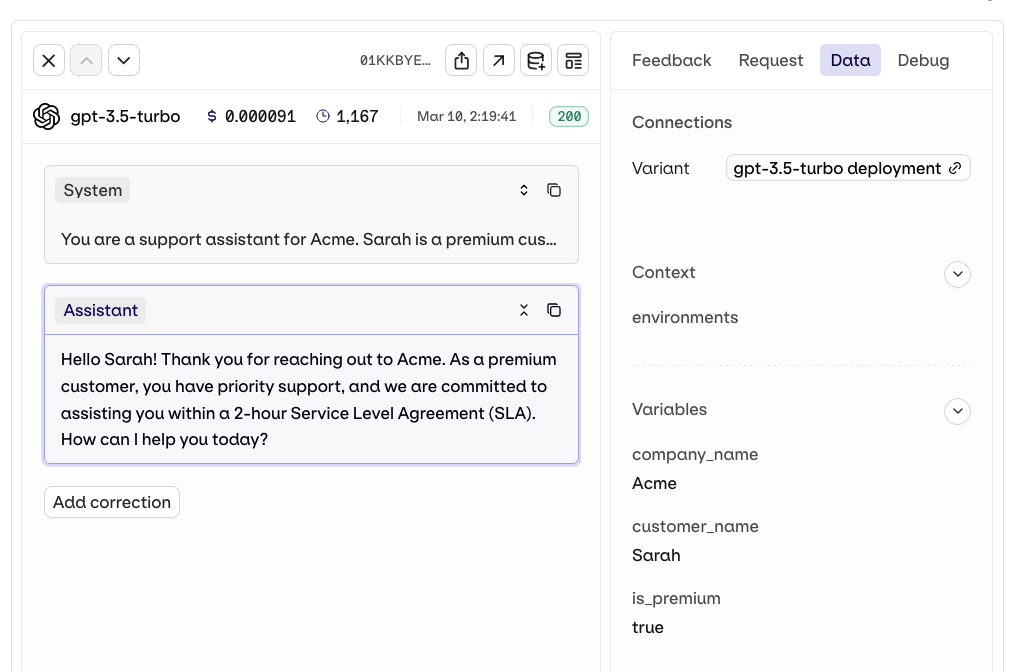
Example: support bot that adapts by subscription tier
Jinja example
1
Prompt template
Jinja
You are a support assistant for {{company_name}}.{% if user_tier == "premium" %}{{customer_name}} is a premium customer. Greet them by name and let them know they have priority support with a 2-hour response SLA.{% else %}{{customer_name}} is on the free plan. Let them know the standard response time is 24 hours.{% endif %}
You are a support assistant for {{company_name}}.{{! Pass is_premium: true for premium customers, false for free plan }}{{# is_premium}}{{customer_name}} is a premium customer. Greet them by name with priority support and a 2-hour SLA.{{/ is_premium}}{{^ is_premium}}{{customer_name}} is on the free plan. Standard response time is 24 hours.{{/ is_premium}}
Add {{variable_name}} placeholders to the prompt and pass the corresponding values in the inputs field at invoke time. Orq.ai substitutes each key before sending the prompt to the model.
See install and setup to get started with the CLI. Run orq deployments invoke --help for the full flag reference.
For a complete reference of all template features including filters, nested objects, and more, see Prompt Templating.
To prevent sensitive input values from appearing in traces and logs, see Security and Privacy.
Knowledge Base
AI Studio
API & SDK
CLI
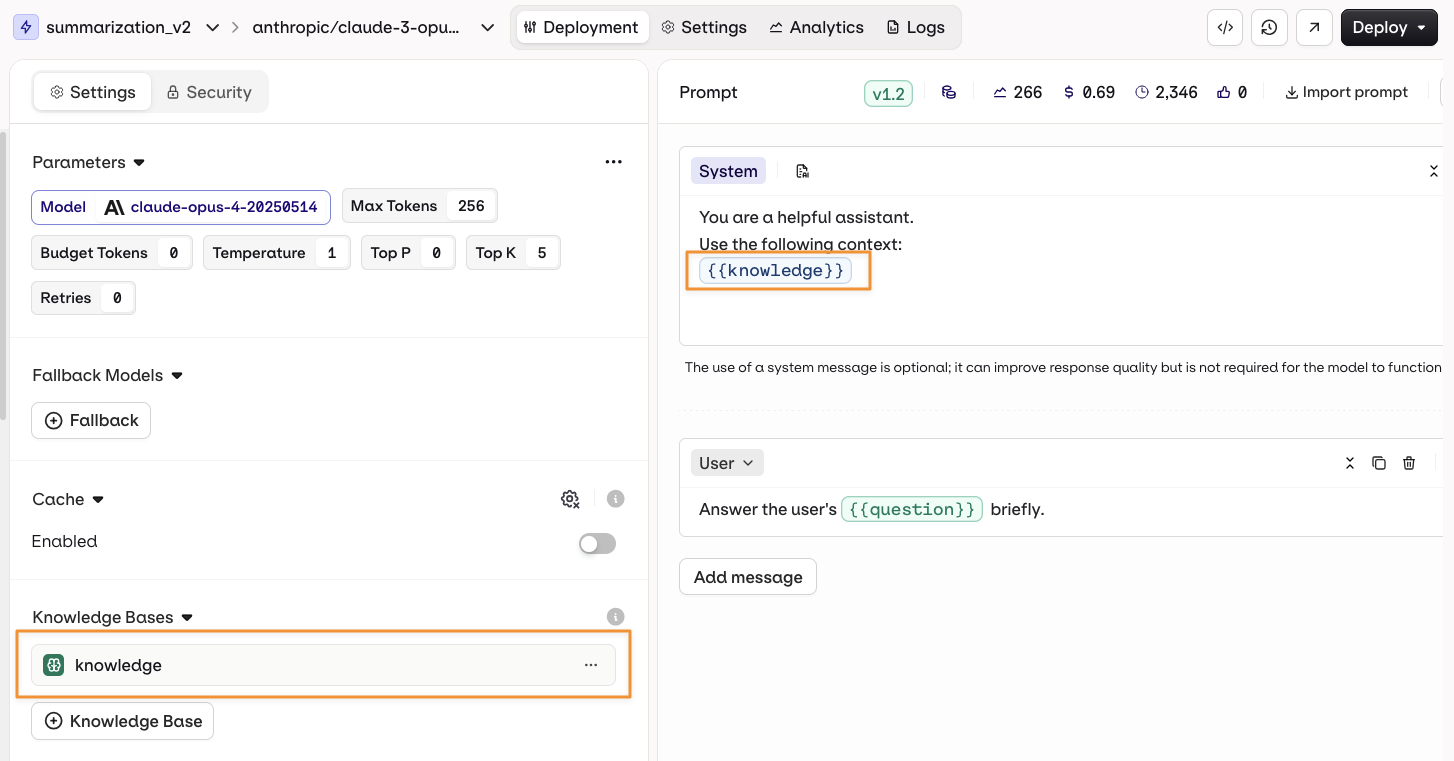
Ground a Deployment’s responses in domain-specific knowledge by adding a Knowledge Base.Open the deployment configuration, go to Knowledge Bases, then select Knowledge Base.
Knowledge Bases enable RAG (Retrieval-Augmented Generation), allowing the model to retrieve and use relevant information from documentation or data sources to provide more accurate and contextual responses.
Configuration options (via the ... menu on an attached Knowledge Base):
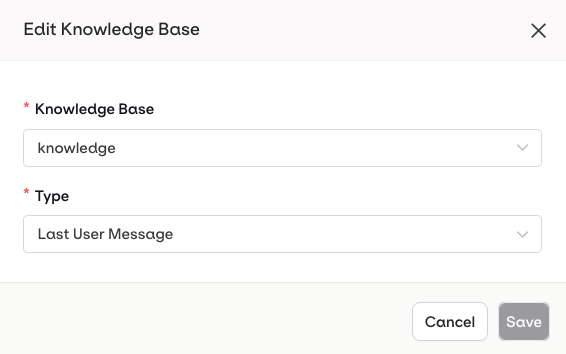
Last User Message: the user’s latest message is automatically used as a query to retrieve relevant chunks.
Query: a predefined query is used to retrieve chunks. Use Input Variables like {{query}} to make it dynamic at runtime.
Configure which Knowledge Base to use and how it should be queried in the deployment.
To learn more about creating and configuring Knowledge Bases, see Knowledge Bases.
Reference the Knowledge Base in the prompt using the {{knowledge_base_key}} syntax, where knowledge_base_key is the identifier of the Knowledge Base. If the Knowledge Base is not explicitly referenced in the prompt, retrieved chunks are automatically appended to the end of the system message.
Using a Knowledge Base in a prompt.
See knowledge base retrieval used end-to-end in a working deployment. Read our cookbook Multilingual FAQ Bot.
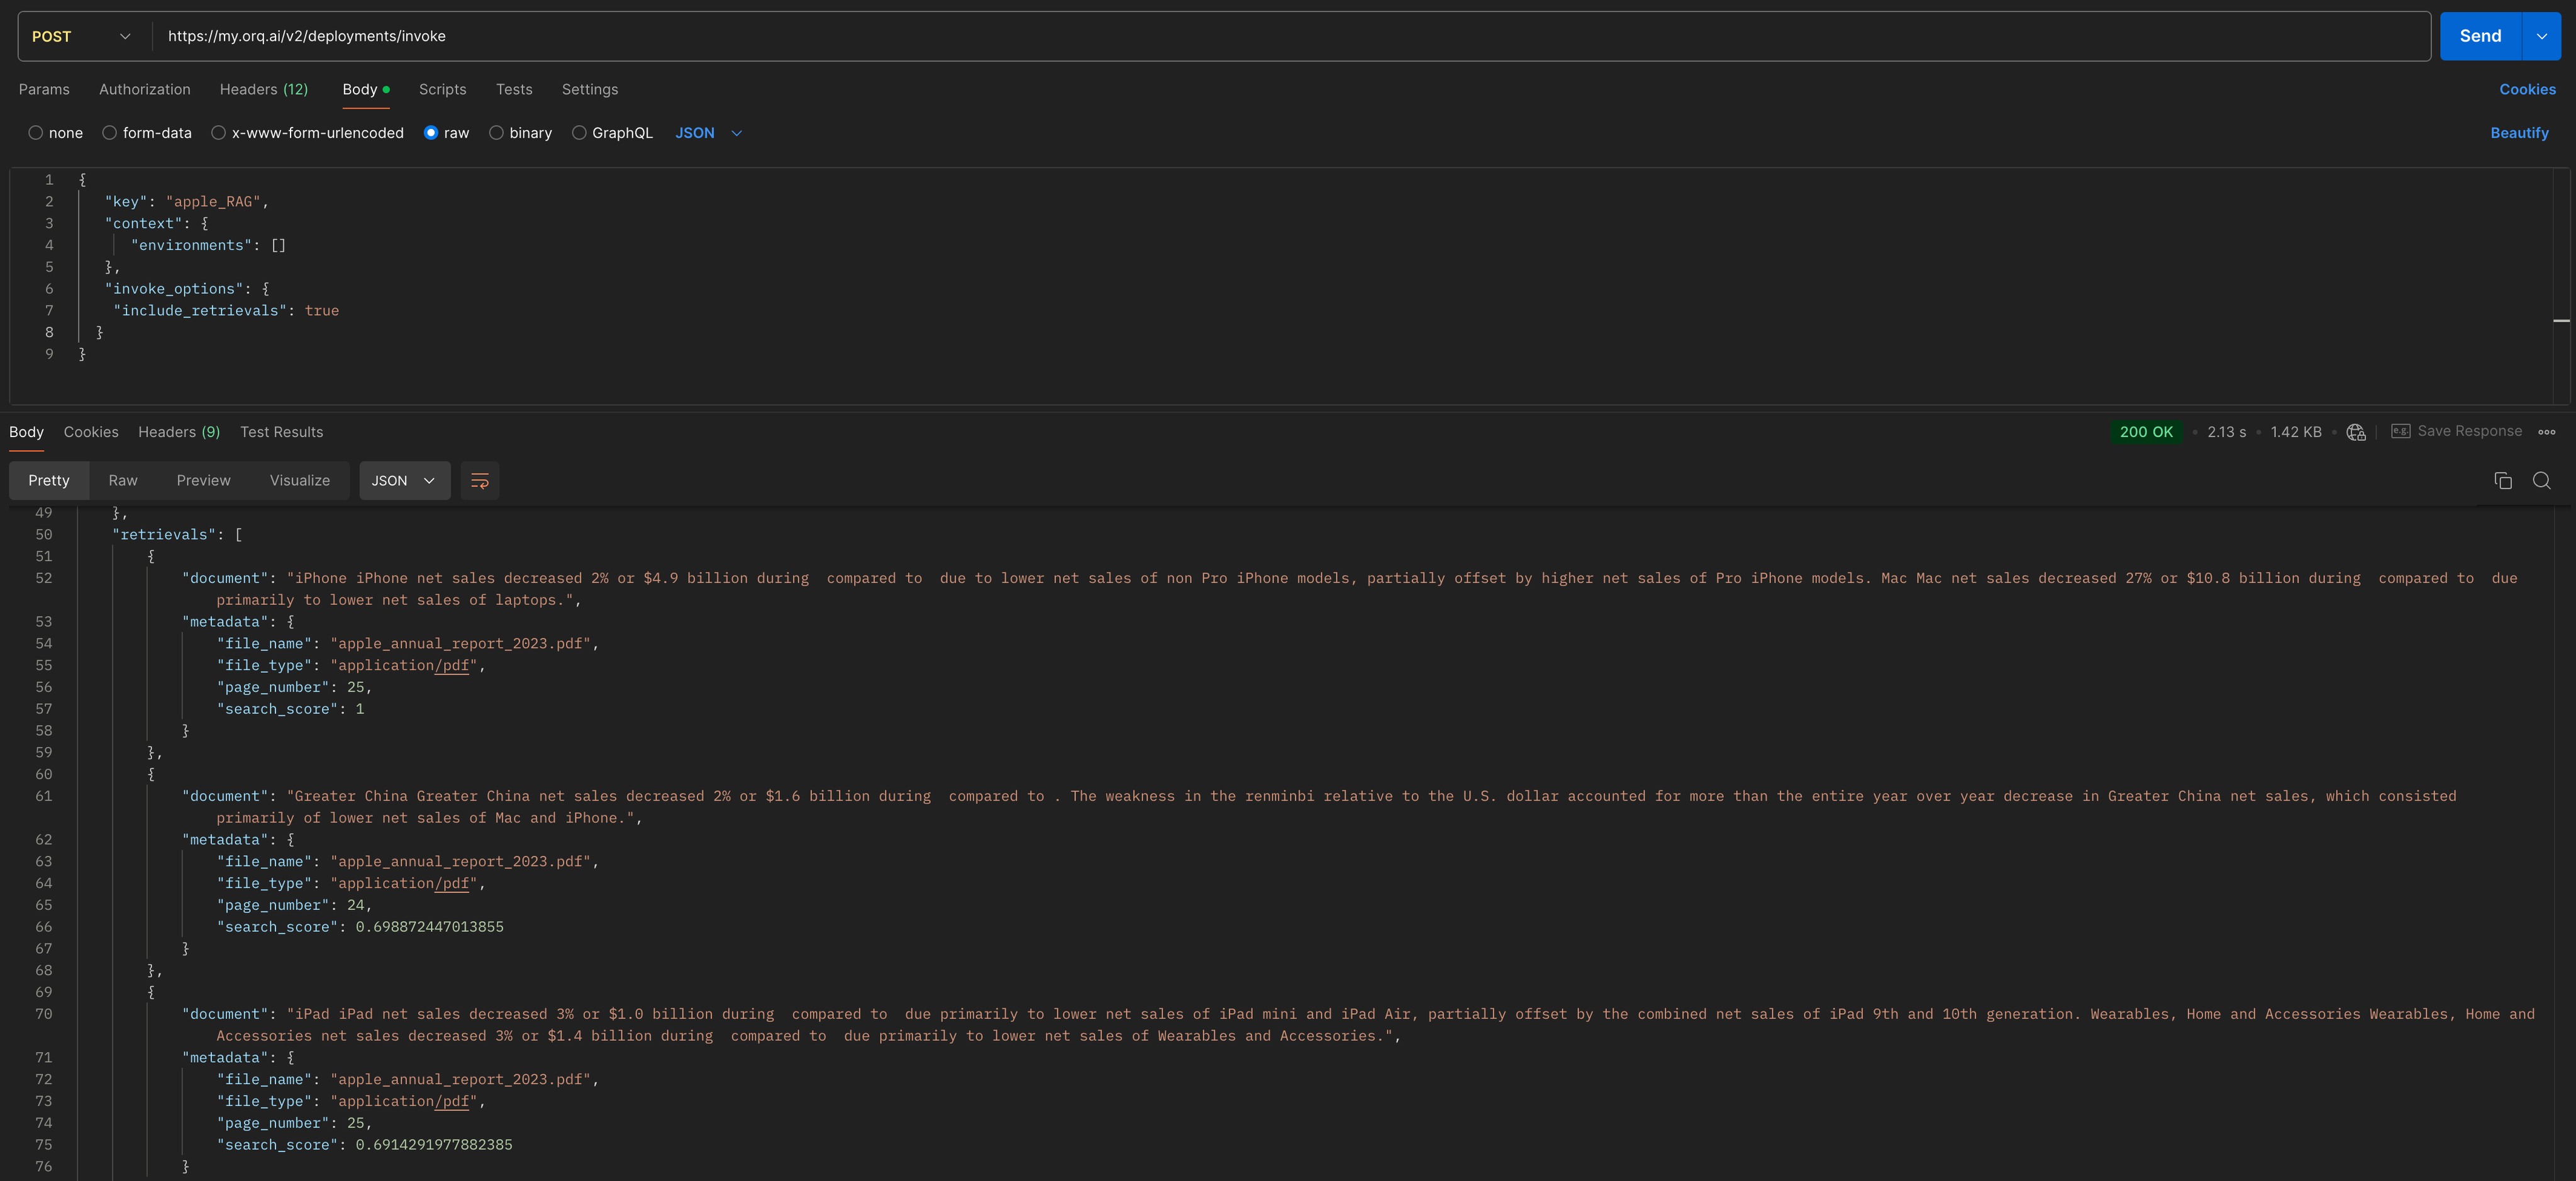
When invoking a Deployment that uses a Knowledge Base, set include_retrievals: true in invoke_options to embed the retrieval chunks in the response.
curl --location 'https://my.orq.ai/v2/deployments/invoke' \--header 'Content-Type: application/json' \--header 'Accept: application/json' \--header 'Authorization: Bearer <ORQ_API_KEY>' \--data '{ "key": "deployment-demo", "messages": [ { "role": "user", "content": "What were the total net sales in 2023?" } ], "invoke_options": { "include_retrievals": true }}'
generation = client.deployments.invoke( key="deployment-demo", messages=[ { "role": "user", "content": "What were the total net sales in 2023?" } ], invoke_options={"include_retrievals": True})print(generation.choices[0].message.content)
const deployment = await client.deployments.invoke({ key: 'deployment-demo', messages: [ { role: 'user', content: 'What were the total net sales in 2023?', }, ], invokeOptions: { includeRetrievals: true },});
Retrievals are returned in the retrievals field of the response. Each chunk includes source details and scores:
Retrieval results are embedded in the retrievals field, containing document details, file metadata, and search scores.
See knowledge base retrievals wired into a complete application. Read our cookbook Multilingual FAQ Bot.
orq deployments invoke \
  --key deployment-demo \
  --messages '[{"role": "user", "content": "What were the total net sales in 2023?"}]' \
  --invoke-options '{"include_retrievals": true}'
See install and setup to get started with the CLI. Run orq deployments invoke --help for the full flag reference.
Tools
AI Studio
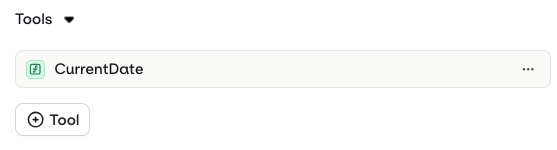
Tools can only be added and configured at the deployment level. Only Function tools are supported in Deployments, enabling the model to call external functions during execution.To add a Function tool, open the Tools tab in the deployment configuration and click Tool:
Create a new Tool: define a custom function directly within the deployment.
Import an existing Tool: select a previously created Function tool from the resource library.
Configure function tools the model can call during deployment execution.
To learn more about creating Function tools, see Creating Tools.
Cache
AI Studio
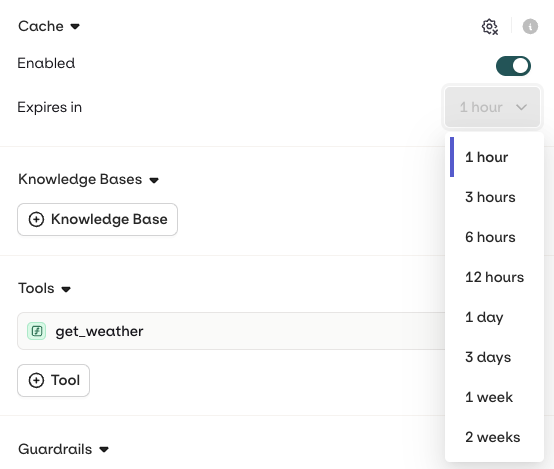
Variant generation can be cached to reduce processing time and cost. When an input is received that matches a cached entry within the Variant, the stored response is returned directly without triggering a new generation.To enable caching, open the Variant Settings tab and select Enabled in the Caching section. The cache can be manually invalidated at any time by clicking the configuration icon.
Configure the cache expiration time.
TTL (time to live) corresponds to the amount of time a cached response is stored before being invalidated. Once invalidated, a new LLM generation is triggered. Configure the TTL from the drop-down once Caching is enabled.
The cache only works when there is an exact match. Image models are not supported.Each cached response is kept as the trace span that produced it, so caching requires Tracing Enabled in Settings → Organization → General.
Evaluators and Guardrails
AI Studio
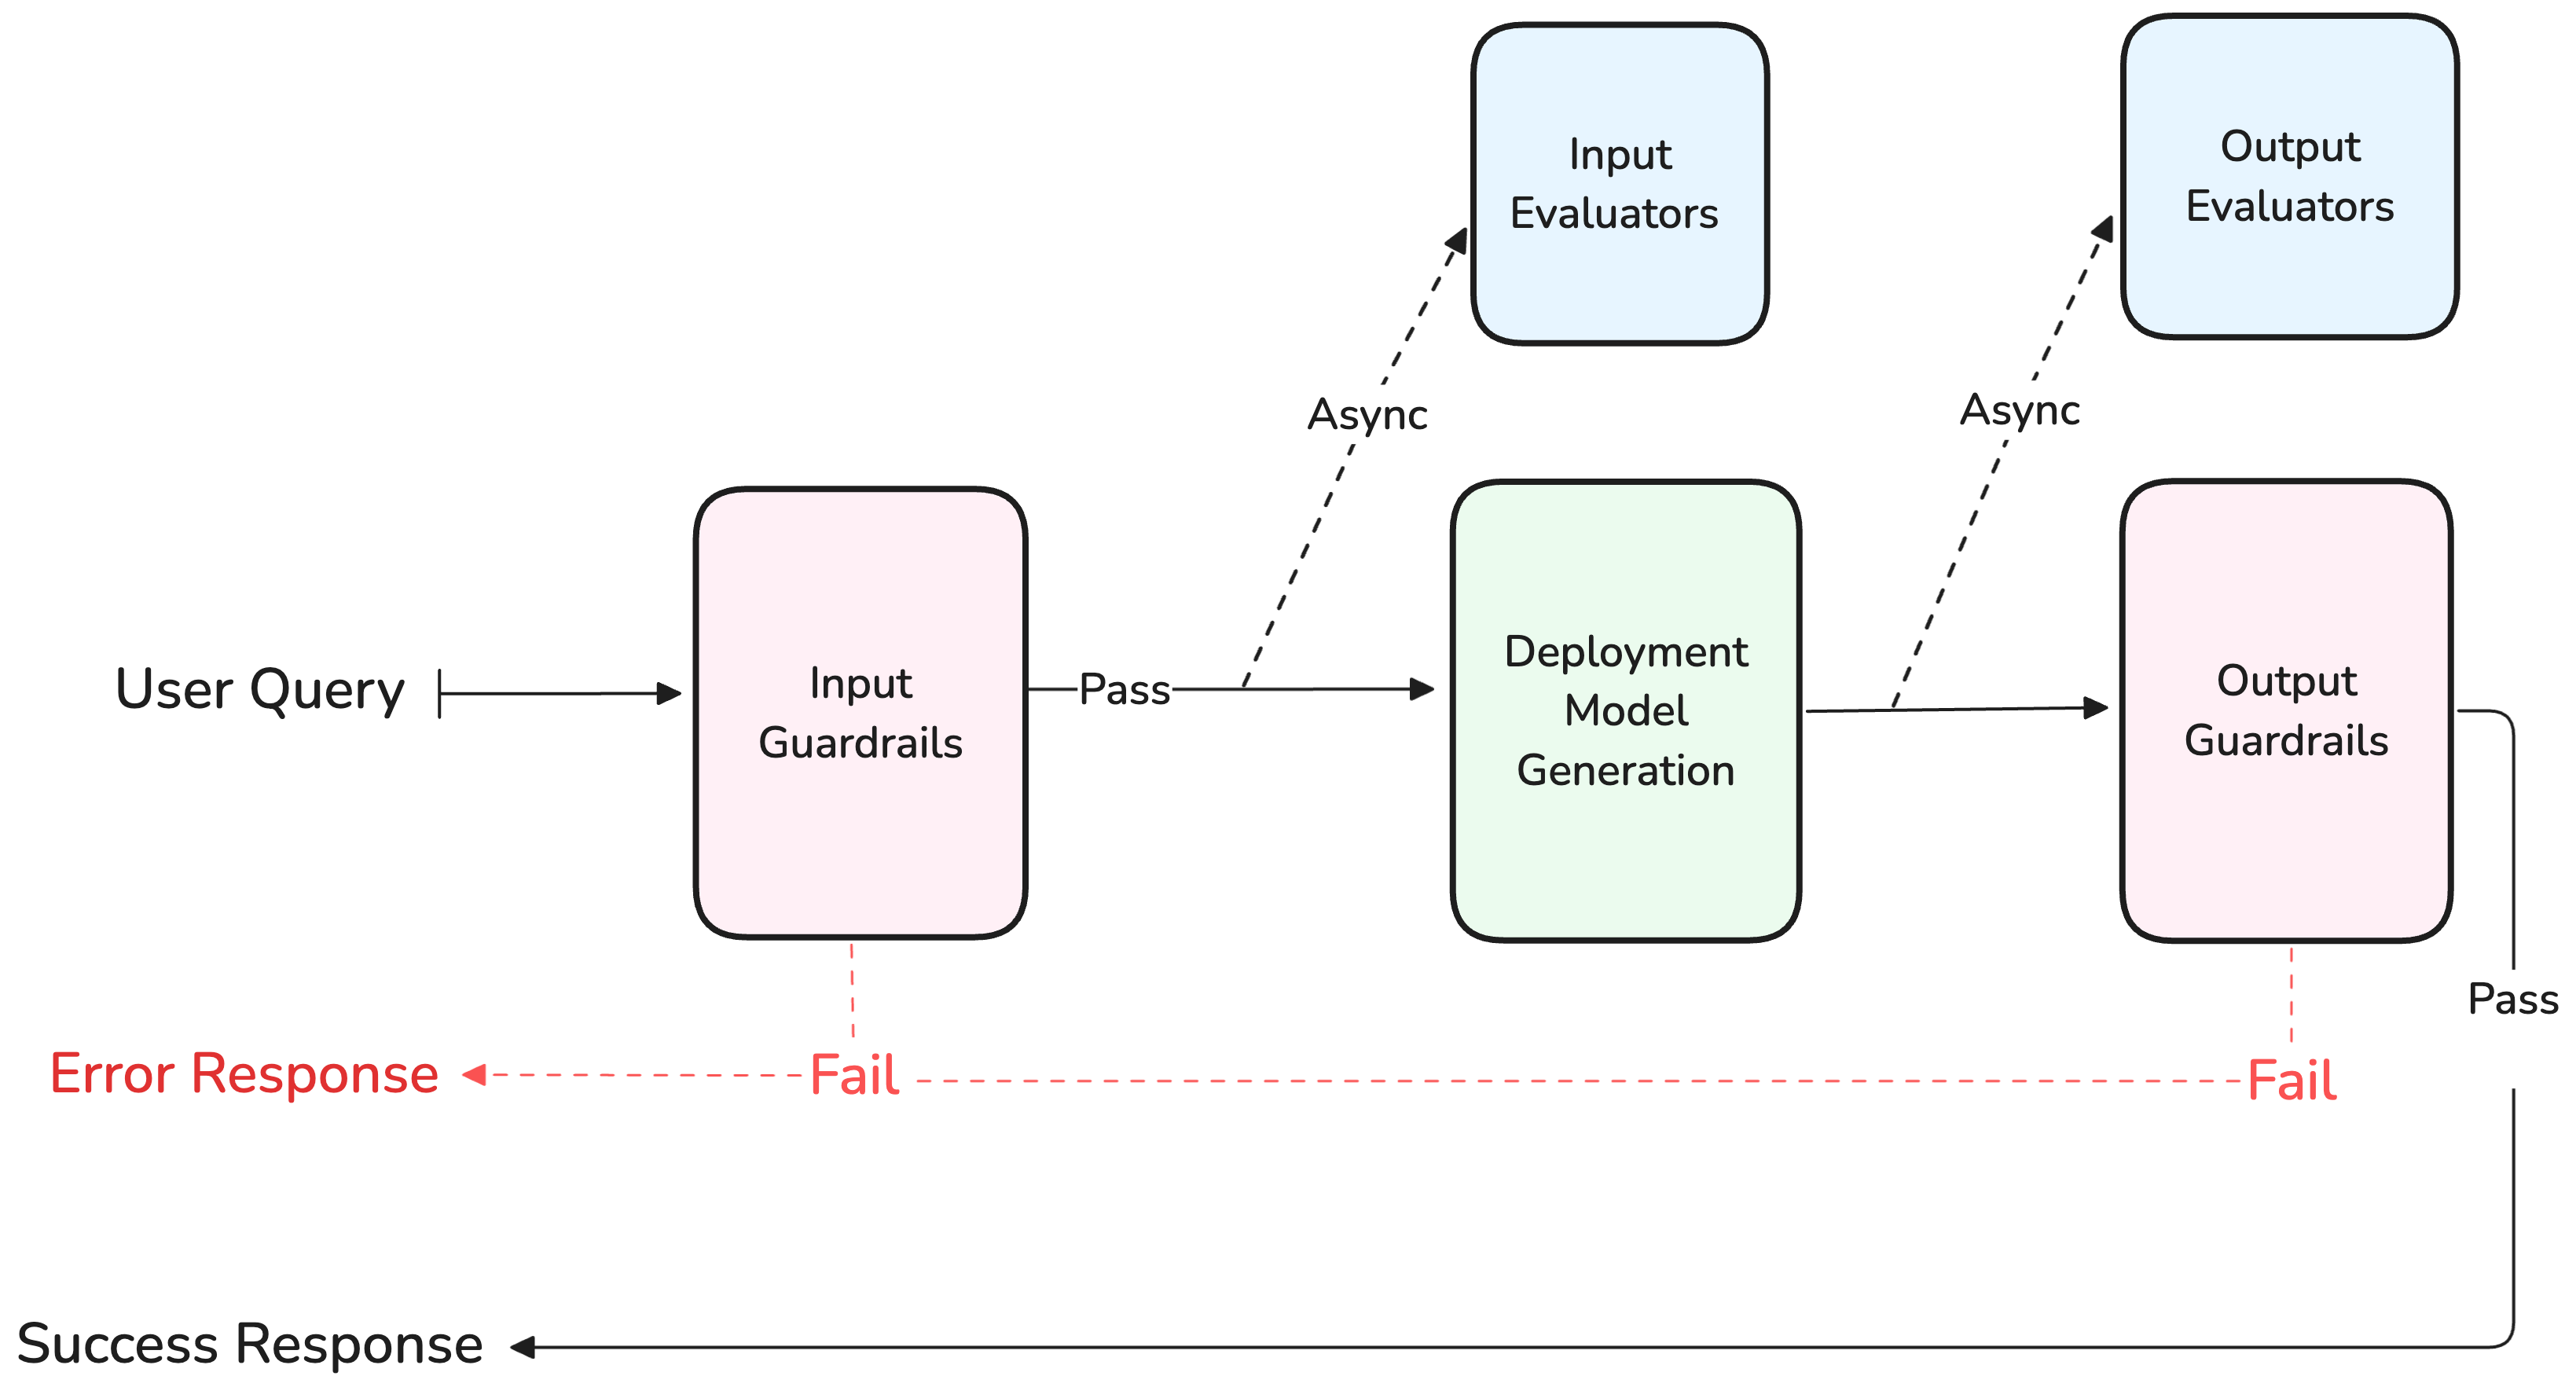
Evaluators and Guardrails are configured as separate sections in the variant settings. Both operate on the generation pipeline but with different behaviours.
Guardrails execute synchronously and can block a generation, while Evaluators run asynchronously and never block the response.
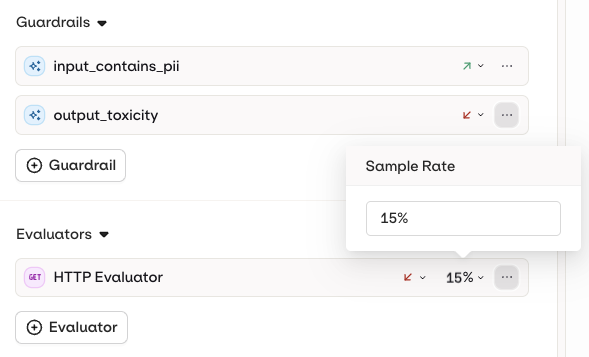
EvaluatorsClick Evaluator to add an evaluator from the Library. Configure each evaluator as:
Input evaluator: runs evaluation on the input sent to the model.
Output evaluator: runs evaluation on the output generated by the model.
Evaluators run asynchronously and never block the response.
Configure a Sample Rate (0–100%) on each evaluator to control how frequently it runs.
Evaluators do not run when using the Test panel in AI Studio. To trigger evaluators, invoke the Deployment externally via the API or SDK.
GuardrailsClick Guardrail to add a guardrail-capable evaluator from the Library.A Guardrail runs synchronously and will deny the generation if its evaluation fails, returning an error to the user. Guardrails can be configured as:
Input Guardrail: runs before the input is sent to the model.
Output Guardrail: runs after generation, before client response.
Guardrail behavior when a guardrail fails:
Behavior
Description
Retry
Triggers a new generation attempt. Use this when a transient or non-deterministic failure may resolve on retry.
Fallback
Executes the fallback model configured on the Deployment. Use this for a safe default response instead of retrying.
Guardrail behavior is configured per Deployment and applies to all guardrails attached to it.
Output Guardrails and Streaming: When a deployment is invoked with streaming enabled, output guardrails will be deactivated as they cannot be run effectively on chunks only.
See guardrails put to the test against adversarial inputs. Read Red Teaming.
Security and Privacy
AI Studio
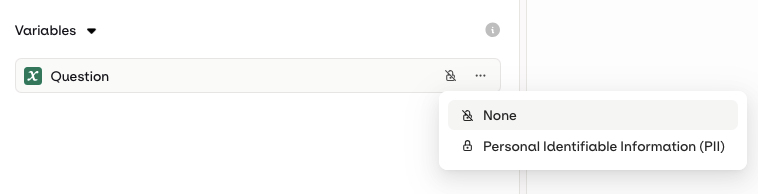
Input MaskingInputs in a Variant can be flagged as PII (Personally Identifiable Information). This is recommended when processing sensitive user data such as names, email addresses, or phone numbers.To configure this, open the Security tab when editing an input and choose Personally Identifiable Information (PII) from the Privacy drop-down.
Once deployed, the input value will not be logged within Orq systems.
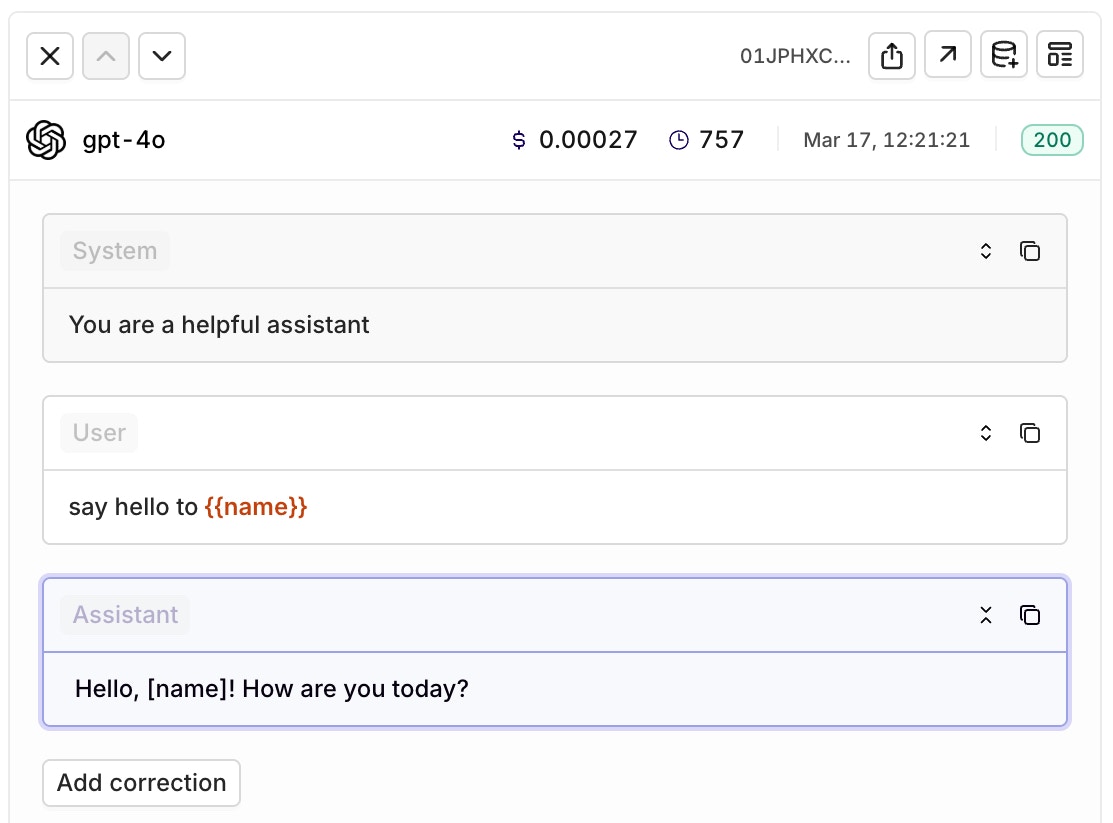
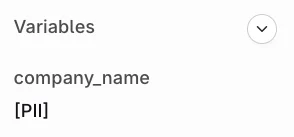
Flagging an input as PII removes its values from logs and traces. When opening a log or trace, the input is shown in red to indicate it was not logged. The API response itself still includes the PII value.
The API response will include the PII, but input and output logs and traces will not be logged in Orq.ai.
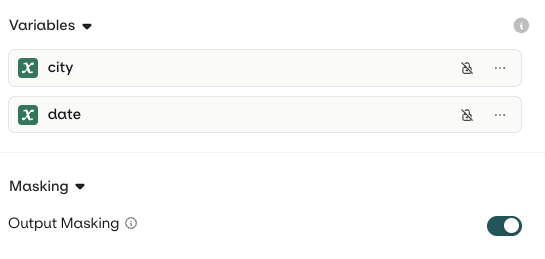
Output MaskingEnable output masking to hide generated outputs from logs and traces. Head to the Security tab in the Variant and enable the Output masking toggle.When Output Masking is enabled, logs and traces will not store the generated response.
Add a Variant
AI Studio
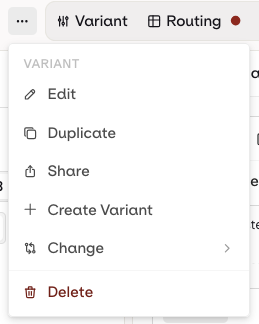
A single Deployment can hold multiple Variants. Multiple Variants can handle different use cases and scenarios within one Deployment, and can be served simultaneously through Routing.To add a new Variant, select the Variant name at the top-left of the screen and choose Add variant.
Switch between Variants and add a new Variant to a Deployment at any time.
Routing
AI Studio
Once a Variant is ready to be deployed, configure the routing variables to control which Variant is reached. Open the Routing page by selecting Routing at the top-left of the panel.
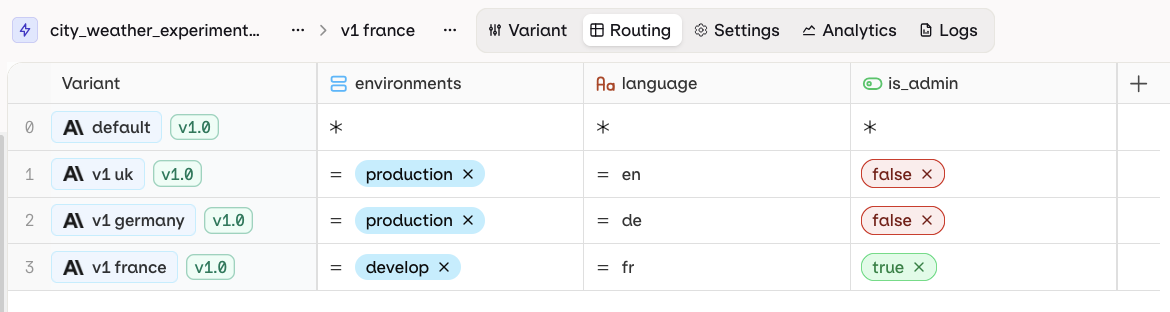
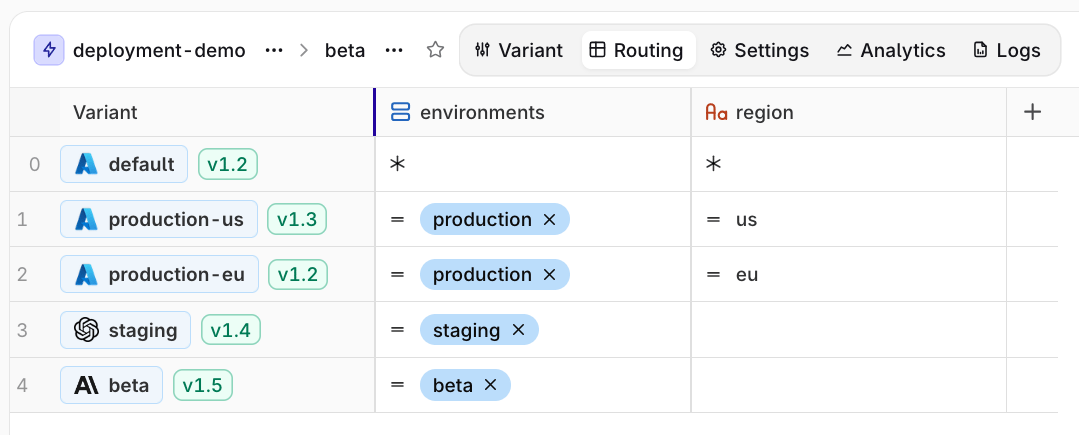
The Routing panel maps Variants to Context field values. Each row is a Variant, each column is a Context field, and each cell is a condition that must match for that Variant to be selected. A Variant is selected only when every condition in its row matches, and the first matching row wins.
An example routing table using list, string, and boolean Context fields.
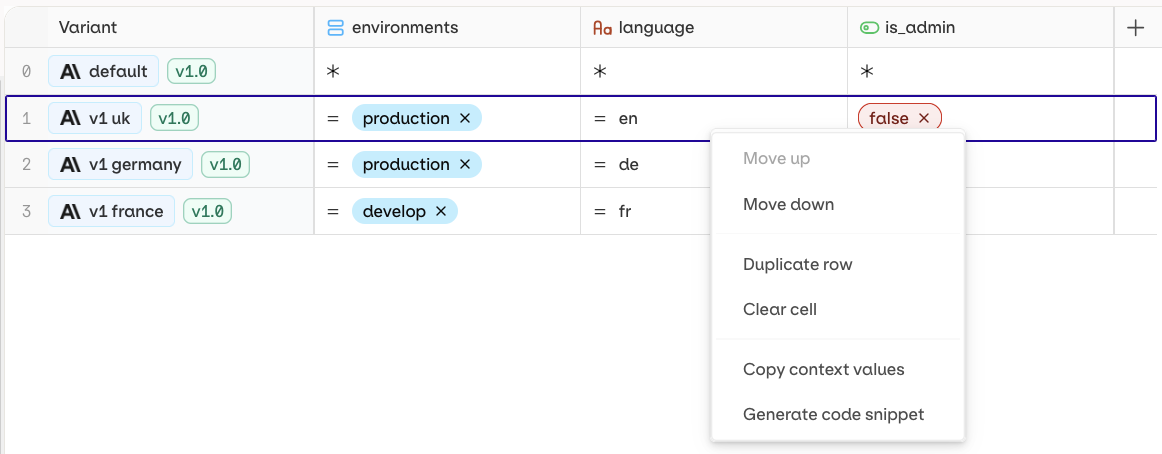
Default variant: The top Variant in the Routing table is the default. If no routing rules match, or no context values are provided, the request is routed to it.Code SnippetsRight-click on any Variant in the Routing table and select Generate Code Snippets to get ready-to-use code for that specific Variant. Snippets include the correct context environment to reach the selected Variant.
Right-click on the variant path to generate code snippets.
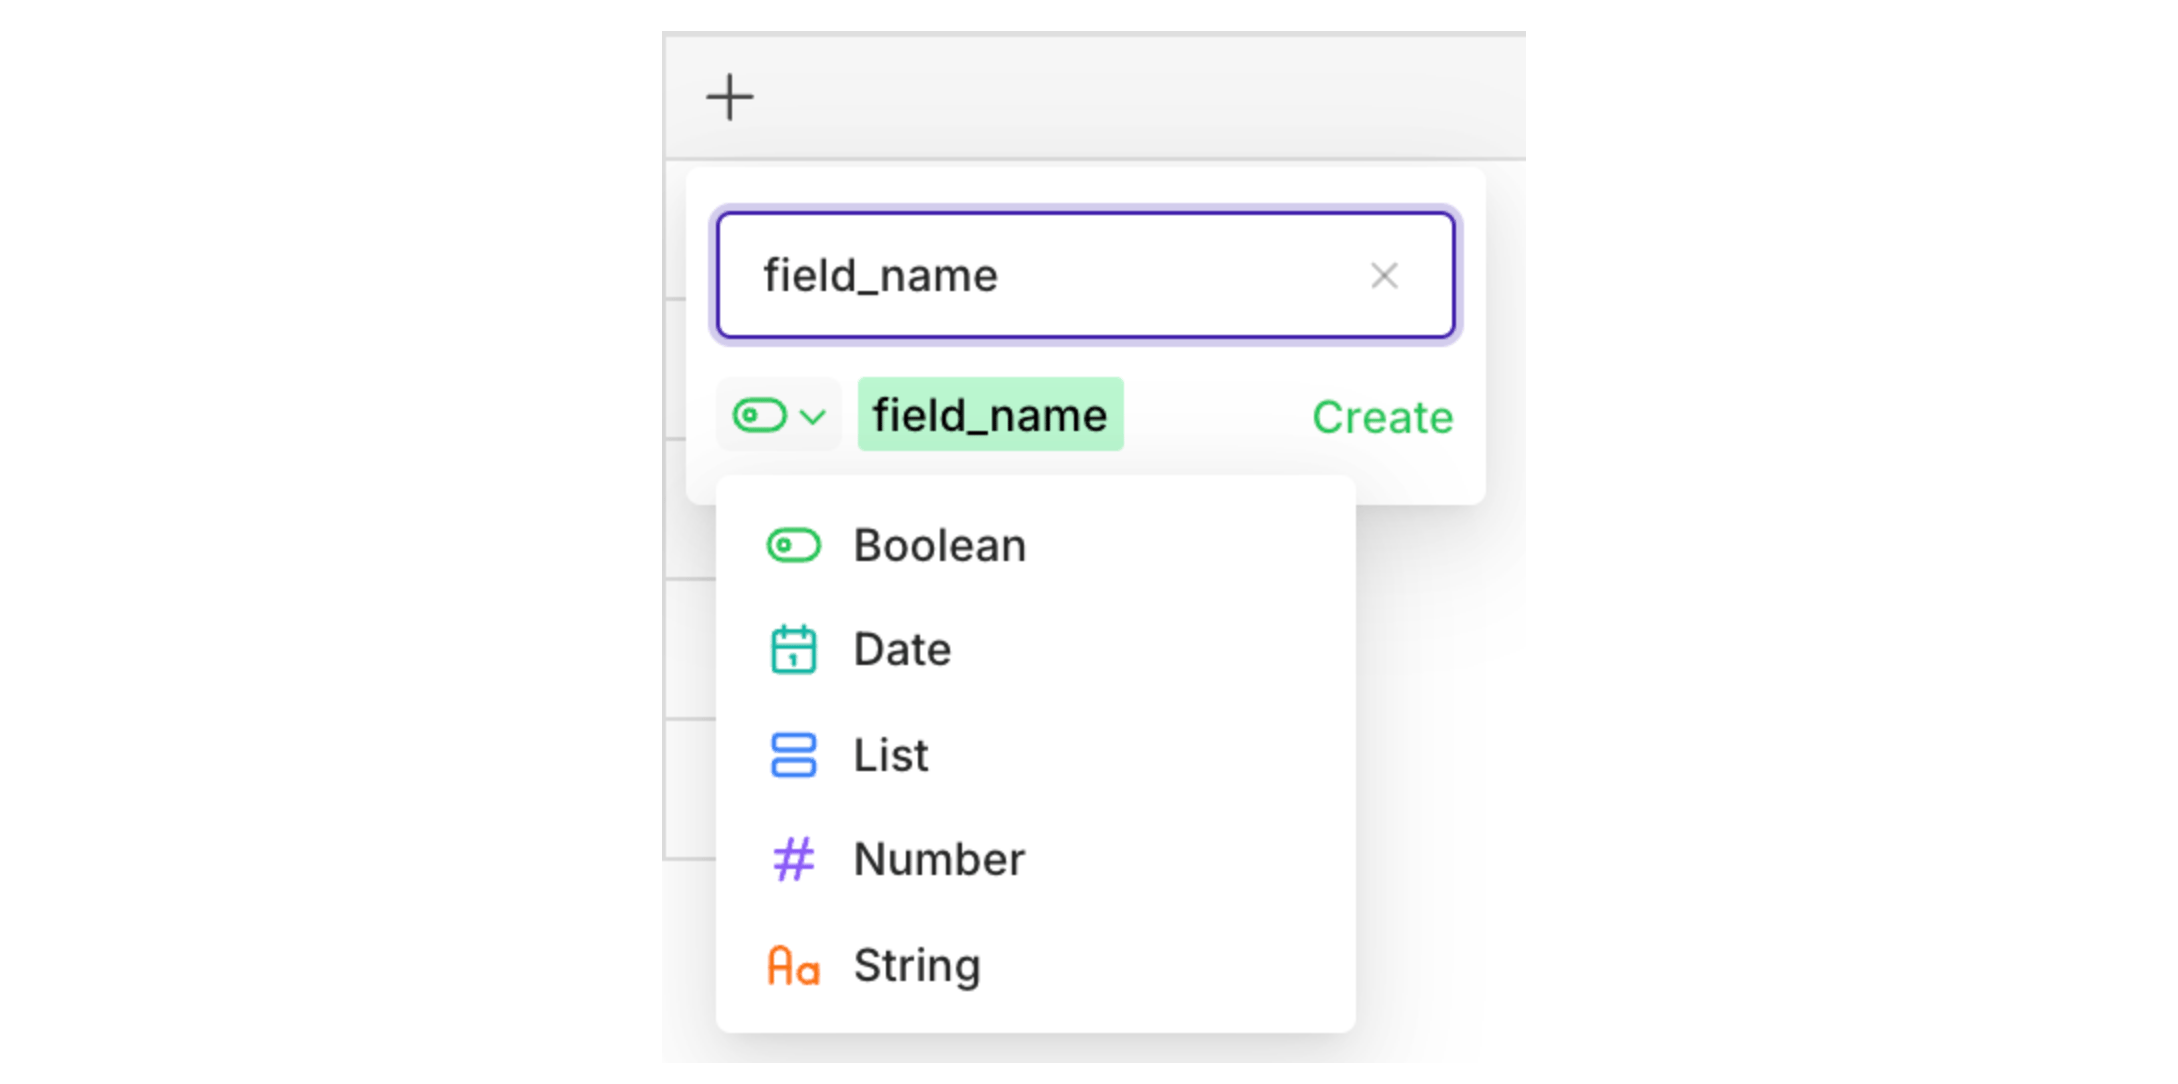
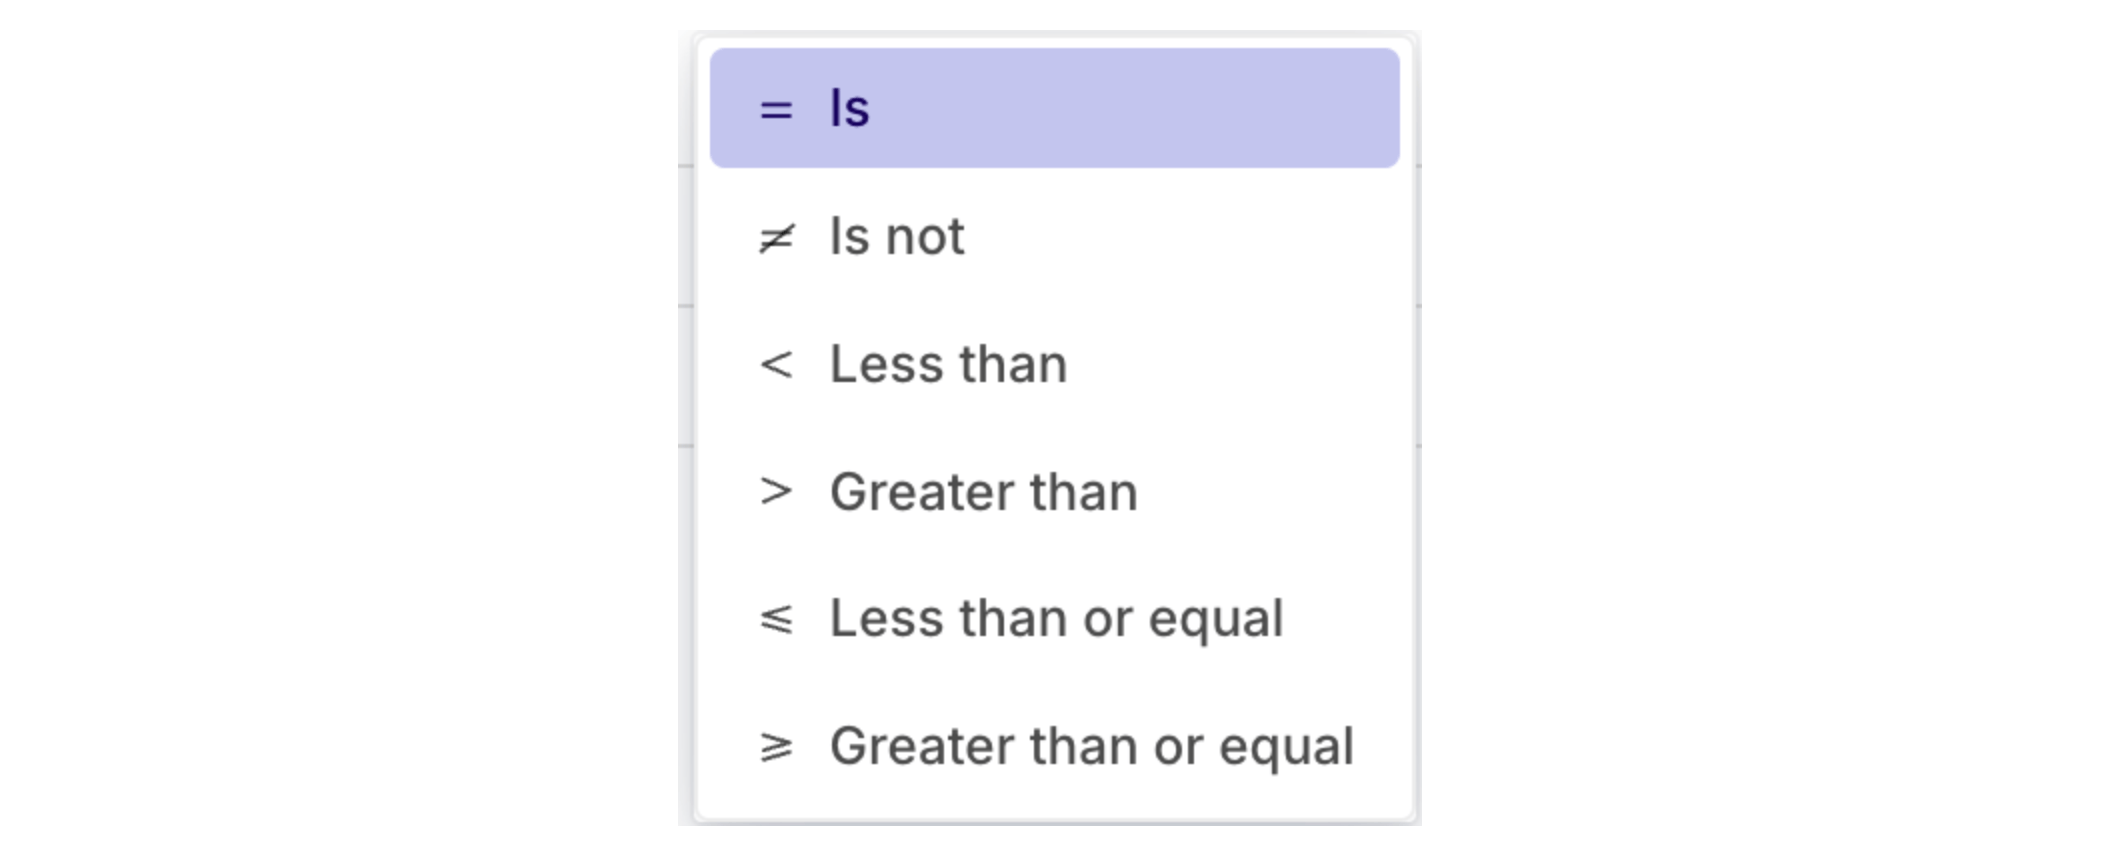
Context FieldsTo add a new context field, press the button at the top right of the Routing table. Set a name and type for the field: boolean, date, list, number, or string.Routing ConditionsCreate a custom routing condition for each field and Variant by entering a value in the corresponding cell. By default, the = operator is used. Click = to change the operator.
Different operators are available depending on the field type.
SimulatorRouting can be tested at any time by opening the Simulator via the Simulator icon at the top-right of the Routing panel. Enter values for all field configurations and select Simulate to see which Variant the query routes to.
Versioning
AI Studio
Version control tracks all changes to the model and prompt configuration. A new commit is made on each deployment and history is preserved throughout. All changes can be viewed, and any prior version can be restored.
Deploying a New VersionWhen the configuration is ready, press the Deploy button on the Variant screen.
The Deploy button is enabled once there are changes to commit.
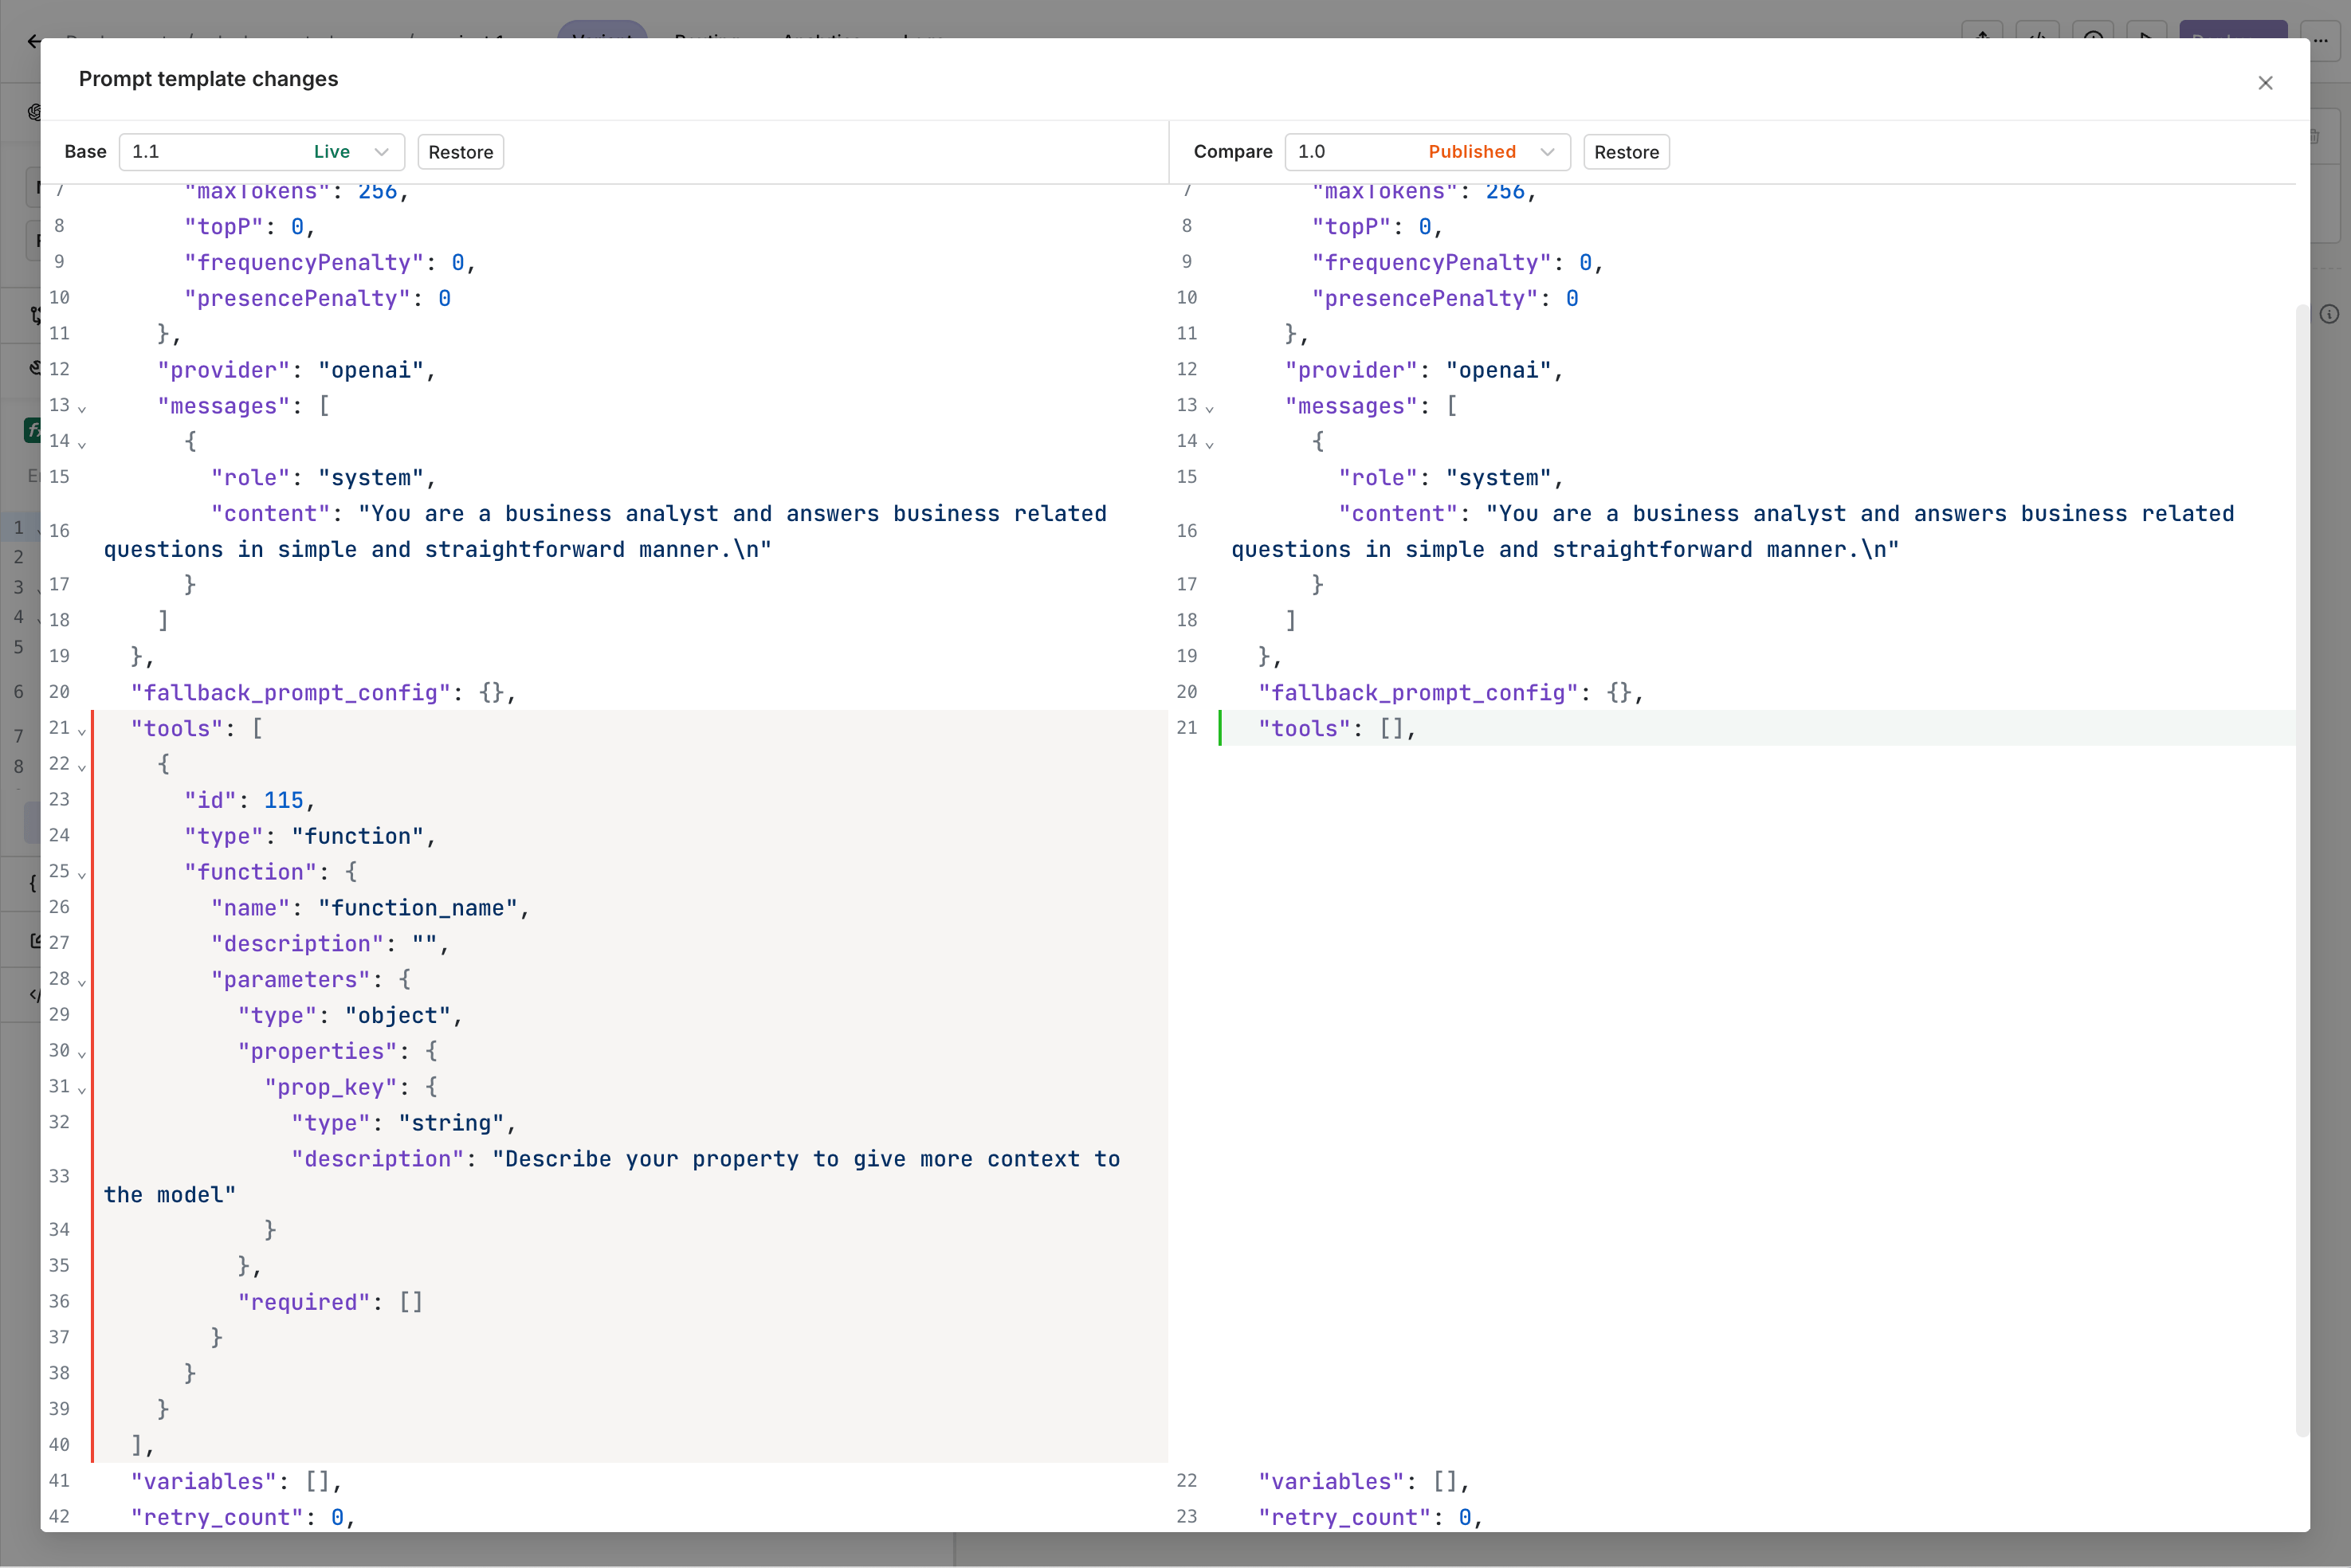
The deployment modal prompts for the new version (Major or Minor bump), a description of the changes, and whether to deploy immediately or save as a draft.Saving a Draft commits the changes on a new version without making them publicly available. They become public on the next deployment.Comparing ChangesSelect the Compare Changes button at the top-right to visualize changes between configurations in a side-by-side JSON view. Restore a previous version by selecting it in the left panel and clicking Restore.
Side-by-side visualization of two versions of the same Variant.
Test a Deployment
AI Studio
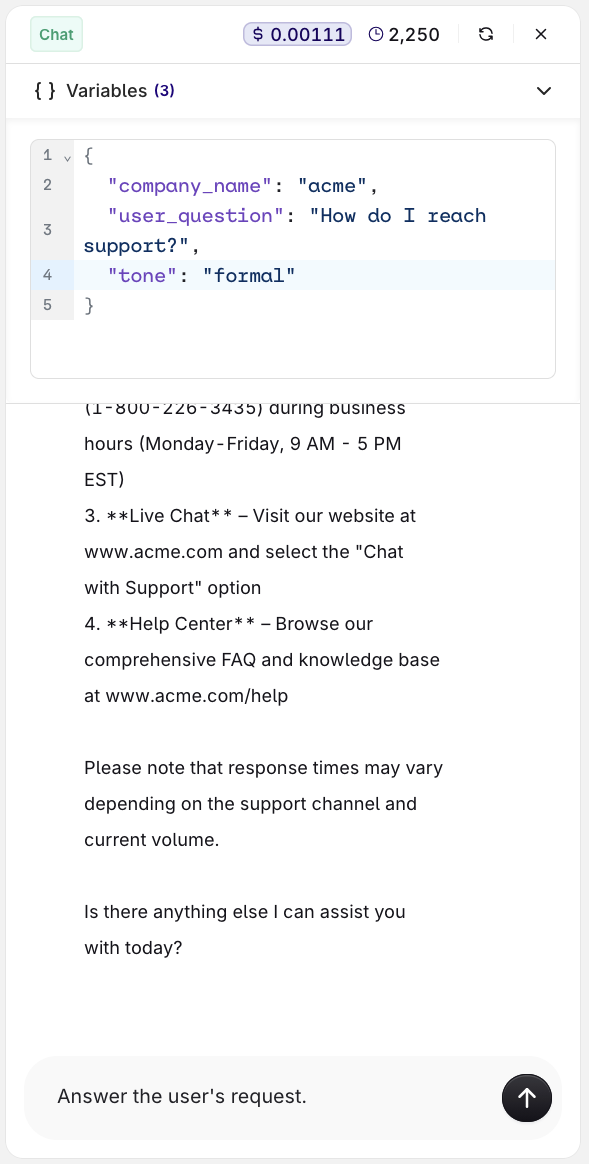
Click Test in the Deployment toolbar to open the Test panel. Enter values for any configured variables and submit to see the model response inline. No code required.This is useful for quickly checking prompt content and model behavior during development.
The Test panel with variable inputs and the model response.
Evaluators configured on the Deployment do not run in the Test panel. To trigger evaluators, invoke the Deployment via the API or SDK.
Invoke a Deployment
AI Studio
API & SDK
CLI
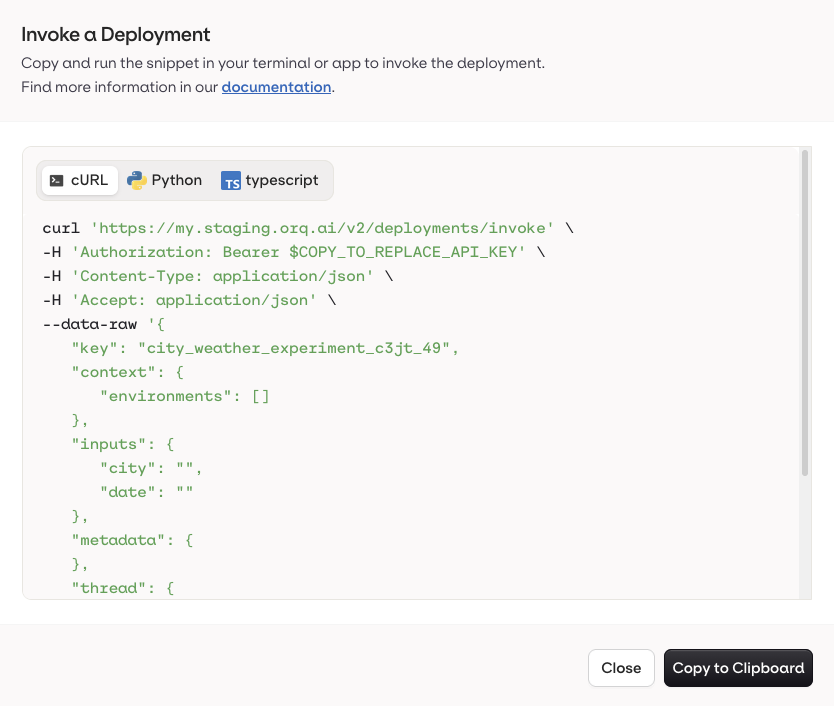
Use the Code Snippet button at the top-right of the Variant page to get ready-to-use integration code for Python, Node.js, and cURL. All snippets include the keys and context variables needed to reach the current Variant.
The Code Snippet button at the top-right of the Variant page.
The Code Snippet panel with all integration languages.
Code snippets per Variant are also accessible from the Routing page:
Open a Deployment and go to the Routing page.
Right-click the target Variant and select Generate Code Snippet.
Invoke a Deployment by sending a request to the /v2/deployments/invoke endpoint. Orq.ai routes the request to the correct Variant, applies all configured settings, and returns the model’s response.
curl --request POST \
  --url https://my.orq.ai/v2/deployments/invoke \
  --header 'Authorization: Bearer <ORQ_API_KEY>' \
  --header 'Content-Type: application/json' \
  --data '{
    "key": "deployment-demo",
    "context": {"environments": "production"},
    "messages": [
      {
        "role": "user",
        "content": "What is the return policy for electronics?"
      }
    ]
  }'
generation = client.deployments.invoke( key="deployment-demo", context={"environments": "production"}, messages=[ { "role": "user", "content": "What is the return policy for electronics?", } ],)print(generation.choices[0].message.content)
const generation = await client.deployments.invoke({ key: 'deployment-demo', context: { environments: 'production' }, messages: [ { role: 'user', content: 'What is the return policy for electronics?', }, ],});console.log(generation.choices[0].message.content);
The response includes prompt_tokens, completion_tokens, and total_tokens.IdentityAssociate an identity with deployment invocations for tracking and personalization.Identity fields:
id: Unique identifier for the identity (required).
orq deployments invoke \
  --key deployment-demo \
  --context environments=production \
  --messages '[{"role": "user", "content": "What is the return policy for electronics?"}]'
See install and setup to get started with the CLI. Run orq deployments invoke --help for the full flag reference.
Route to a Variant
Pass context values in the invocation payload to reach a specific Variant. The Routing table decides which one receives the request, and the default Variant handles anything that matches no row.
An example routing table.
The following examples send the same user question to the Deployment above with different context values, so each one reaches a different Variant.
API & SDK
CLI
Staging
Routes to the staging Variant:
curl --request POST \
  --url https://my.orq.ai/v2/deployments/invoke \
  --header 'Authorization: Bearer <ORQ_API_KEY>' \
  --header 'Content-Type: application/json' \
  --data '{
    "key": "deployment-demo",
    "context": {"environments": "staging"},
    "messages": [
      {
        "role": "user",
        "content": "What is the return policy for electronics?"
      }
    ]
  }'
generation = client.deployments.invoke( key="deployment-demo", context={"environments": "staging"}, messages=[ { "role": "user", "content": "What is the return policy for electronics?", } ],)print(generation.choices[0].message.content)
const generation = await client.deployments.invoke({ key: 'deployment-demo', context: { environments: 'staging' }, messages: [ { role: 'user', content: 'What is the return policy for electronics?', }, ],});console.log(generation.choices[0].message.content);
generation = client.deployments.invoke( key="deployment-demo", context={"environments": "production", "region": "eu"}, messages=[ { "role": "user", "content": "What is the return policy for electronics?", } ],)print(generation.choices[0].message.content)
const generation = await client.deployments.invoke({ key: 'deployment-demo', context: { environments: 'production', region: 'eu' }, messages: [ { role: 'user', content: 'What is the return policy for electronics?', }, ],});console.log(generation.choices[0].message.content);
No context (default)
Omits context entirely, routing to the default Variant:
curl --request POST \
  --url https://my.orq.ai/v2/deployments/invoke \
  --header 'Authorization: Bearer <ORQ_API_KEY>' \
  --header 'Content-Type: application/json' \
  --data '{
    "key": "deployment-demo",
    "messages": [
      {
        "role": "user",
        "content": "What is the return policy for electronics?"
      }
    ]
  }'
generation = client.deployments.invoke( key="deployment-demo", messages=[ { "role": "user", "content": "What is the return policy for electronics?", } ],)print(generation.choices[0].message.content)
const generation = await client.deployments.invoke({ key: 'deployment-demo', messages: [ { role: 'user', content: 'What is the return policy for electronics?', }, ],});console.log(generation.choices[0].message.content);
Pass each Context field as a separate --context flag.Staging:
orq deployments invoke \
  --key deployment-demo \
  --context environments=staging \
  --messages '[{"role": "user", "content": "What is the return policy for electronics?"}]'
Production EU:
orq deployments invoke \
  --key deployment-demo \
  --context environments=production \
  --context region=eu \
  --messages '[{"role": "user", "content": "What is the return policy for electronics?"}]'
No context (default):
orq deployments invoke \
  --key deployment-demo \
  --messages '[{"role": "user", "content": "What is the return policy for electronics?"}]'
See install and setup to get started with the CLI. Run orq deployments invoke --help for the full flag reference.
The invoke response carries the model and provider that answered, not the Variant name. To confirm which Variant handled a request, open Logs and filter on Variant, or on Evaluation to separate Matched from Default Matched. See Analytics and Logs.
Extra Parameters
API & SDK
CLI
Use extra_params to pass parameters not directly exposed by the Orq.ai panel, or to override existing model configuration at runtime.Passing an unsupported parameter:
This feature is only supported with OpenAI, Anthropic, and Google Gemini models.
Embed files directly in the Invoke payload using a file type message with a standard data URI scheme: data:content/type;base64 followed by the base64-encoded file data.
See PDF inputs used to extract structured data end-to-end. Read our cookbook PDF Extraction.
Knowledge Base vs. Direct File AttachmentUse a Knowledge Base when: the information is reused across many requests and RAG (targeted chunk retrieval) is sufficient. Knowledge Bases retrieve relevant chunks but not the full document.Use direct file attachment when: the task requires full-document understanding (e.g. summarization, legal review, detailed analysis), the document is ad-hoc or session-specific, or the data is too sensitive for a shared knowledge repository.
See install and setup to get started with the CLI. Run orq deployments invoke --help for the full flag reference.
Analytics and Logs
AI Studio
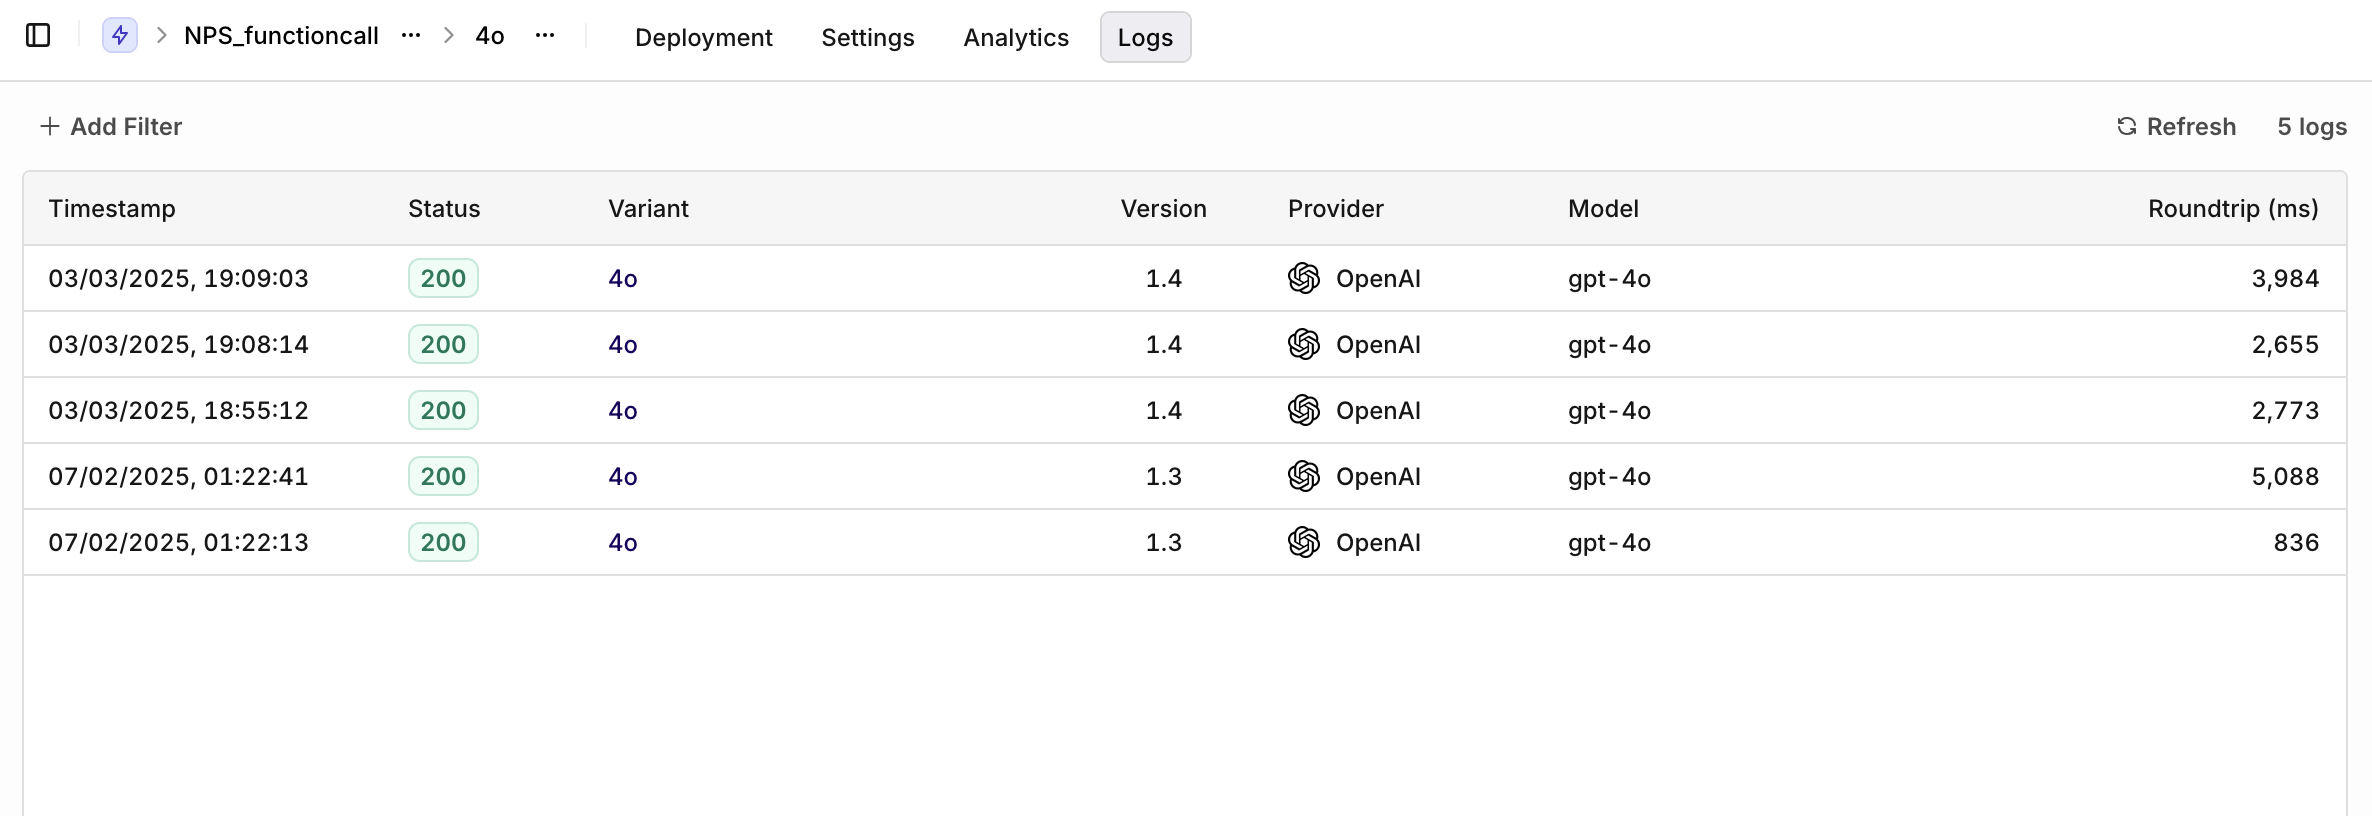
Once a Deployment is running and receiving traffic, detailed analytics of all requests are available.Logs show requests per Variant. Filters available:
Variant: select a single Variant to filter logs.
Evaluation: Matched (a routing rule was matched) or Default Matched (no routing rule matched, default Variant was used).
Source: API, SDK, or Simulator.
Click any log line to open a detail panel showing context, requests, and parameters sent to the Deployment.
Logs overview.
HyperlinkingCopy a generation’s model configuration (prompt, model, and other settings) into another module from the detail panel:
Share
Run in Playgrounds
Create a Deployment
Add Variant to Deployment
Add to Dataset
Size limitA log holds at most 16 MB across text inputs, generations, retrievals, and embedded images. Oversized logs are discarded from the Logs view.
Traces
The Traces tab on a Deployment opens the trace view scoped to that Deployment, with the same rows, filters, and detail panel as Traces.Rows cover every Variant of the Deployment, so a request a routing rule sent to a non-default Variant appears in the same list.
Was this page helpful?
Assistant
Responses are generated using AI and may contain mistakes.


 AI Studio
 MCP