

These are third-party MCP Servers that Orq connects to. This is a different feature from Orq’s own MCP server, which coding assistants connect to for workspace administration.
- Name: the server key, with the provider logo when the server comes from a pre-configured provider
- Description: the description entered at creation
- Access: which projects can use the server
- Last update: when the server last changed
- Created by: the workspace member who added it
MCP connections were previously created as an MCP Tool under Create Tools. That tool type is retired, and existing MCP Tools now appear here in the MCP Portal.
Use Cases
- Connecting third-party SaaS tools (Slack, Linear, Figma, etc.) to agents without writing custom integrations.
- Exposing internal APIs as callable tools for agents.
- Centralizing MCP server management instead of configuring connections per tool or per agent.
- Sharing a single MCP server across multiple agents and gateways with controlled tool exposure.
How It Works
Each MCP Server registers an upstream endpoint. Orq.ai connects to it, discovers the available tools, and tracks the sync state. Tools can be exposed to all agents, filtered by an allow-list, or hidden entirely. When a server is linked to a gateway, the gateway handles tool routing and authentication so clients only need the gateway URL.Set Up an MCP Server
- Click MCP Server.
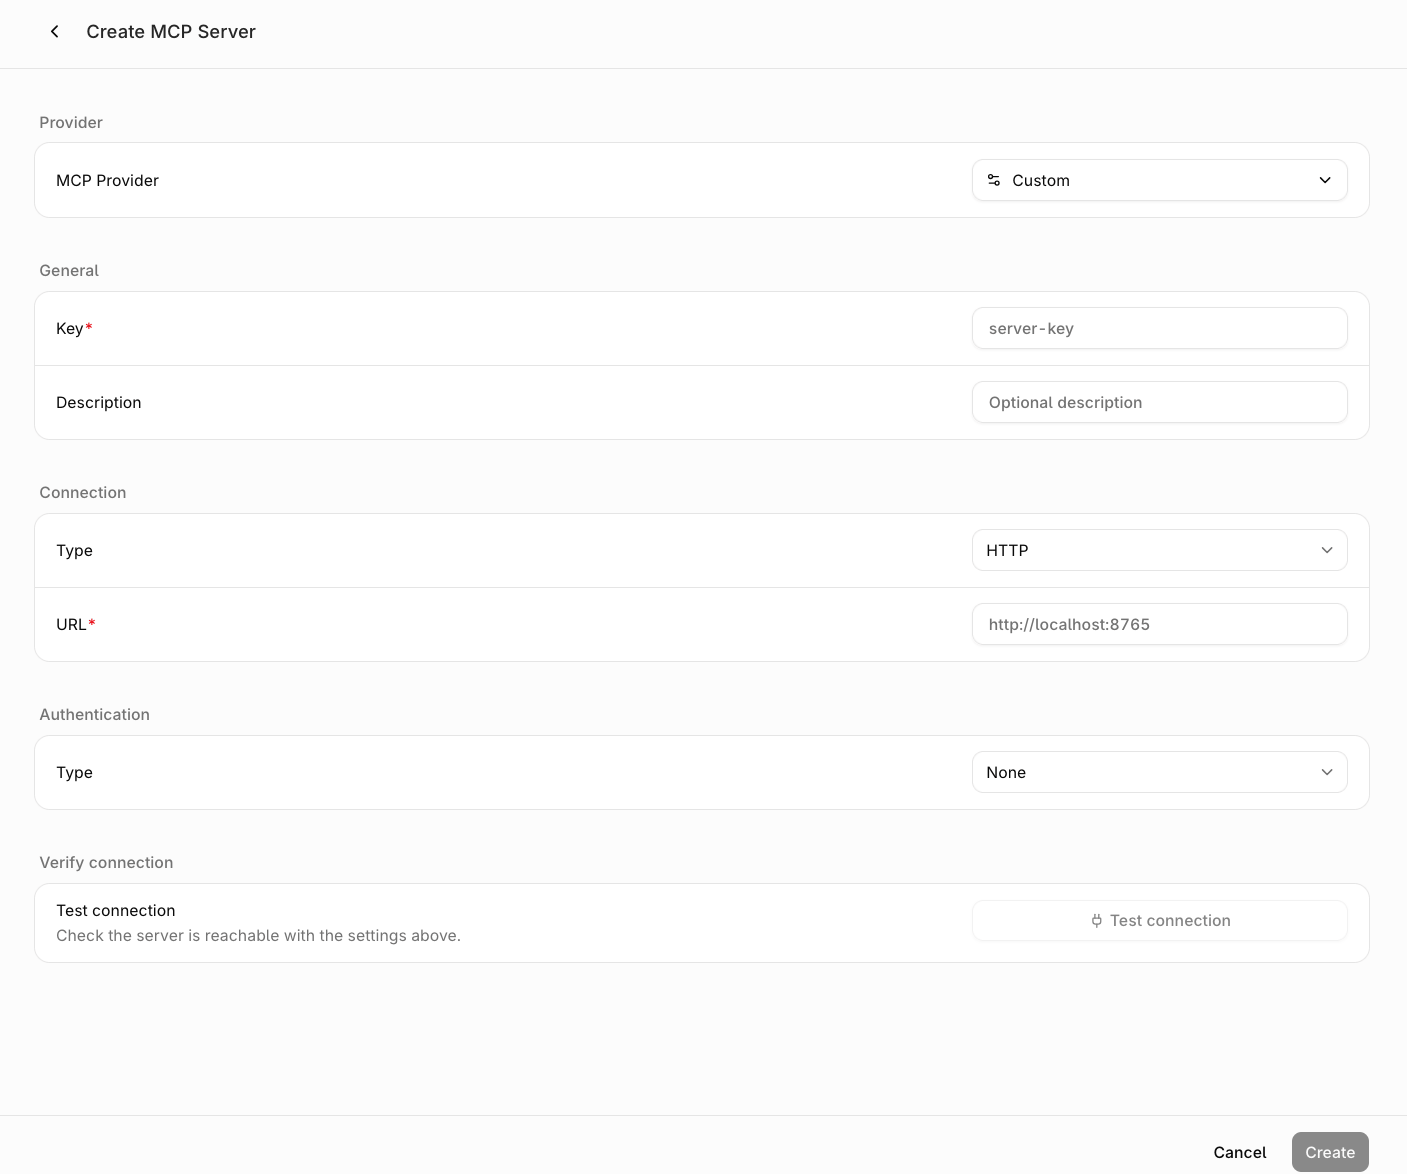
Create MCP Server form
- Pick a provider or enter a custom URL. The MCP Provider dropdown lists pre-configured providers (Airtable, Slack, Linear, and more). Selecting one pre-fills the connection details and authentication headers. Choose Custom to enter a server URL manually.
-
Fill in the general details.
- Key (required): a unique identifier for this server. Used in tool name prefixes when linked to a gateway.
- Description (optional): a note about what this server provides.
-
Set the connection.
- Type: HTTP (default) or SSE for streaming-capable servers.
- URL (required): the endpoint of the upstream MCP server.
-
Configure authentication.
- None (default): for public servers that require no credentials.
- Static Headers: send fixed headers with every request. Use
{{variable}}syntax for sensitive values like API keys. The actual values are stored securely and used at runtime when executing tools through agents or gateways. - OAuth Client Credentials: authenticate with an upstream OAuth 2.0 authorization server using the client credentials grant. Fill in the Client ID, Client Secret, and Token URL (the endpoint that issues tokens, for example
https://accounts.example.com/oauth/token). The client secret is stored securely and never returned in API responses. See How OAuth Client Credentials works. This credential is distinct from the OAuth flow MCP clients use to connect to a gateway.
- Test the connection. Click Test connection to probe the server before saving. This validates the URL and authentication, and returns the list of discovered tools.
- Click Create.
How OAuth Client Credentials works
Orq.ai requests an access token only when one is needed: when Test connection runs, when the server syncs its tools, and when a tool is executed through an Agent or a Gateway. No background process mints tokens. Each token is held in memory and reused until it approaches expiry, then a new one is requested automatically. Orq.ai honors theexpires_in value returned by the authorization server and renews 30 seconds before it elapses. When the authorization server omits expires_in, the token is reused for 5 minutes. The client credentials grant has no refresh token, so renewal is a fresh exchange of the same Client ID and Client Secret. Nothing needs to be rotated manually.
Access tokens are never written to the database. Only the Client ID and the encrypted Client Secret are stored. Tokens are never shared between MCP Servers: each combination of Token URL, Client ID, and scopes gets its own token and its own upstream connection.
Scopes are supported through the API and the SDKs with the auth.oauth.scopes field, and are sent as the scope parameter on the token request. The form does not expose them.
The token endpoint must respond directly. Redirects from the Token URL are refused, and the host must be reachable on the public internet. An allowed-domain list configured on a linked MCP Gateway restricts the upstream server URL but not the Token URL, since authorization servers commonly live on a different domain.
Per-user OAuth (API)
MCP_AUTH_TYPE_PER_USER_OAUTH is available through the API and SDKs, not the console. Each end user supplies a token of their own, in place of a single credential shared across the workspace.
- The server stores the authorization server details; the gateway verifies the token presented on each tool call against that server.
- A call without a valid token answers
401with aWWW-Authenticatechallenge. - Create and update accept the type.
- Test connection does not: it runs without an end user, so there is no per-user token to present, and the API answers
400.
After Creation
Once saved, Orq.ai syncs with the upstream server and discovers its tools. The server detail page shows discovered tools on the left and tool details on the right.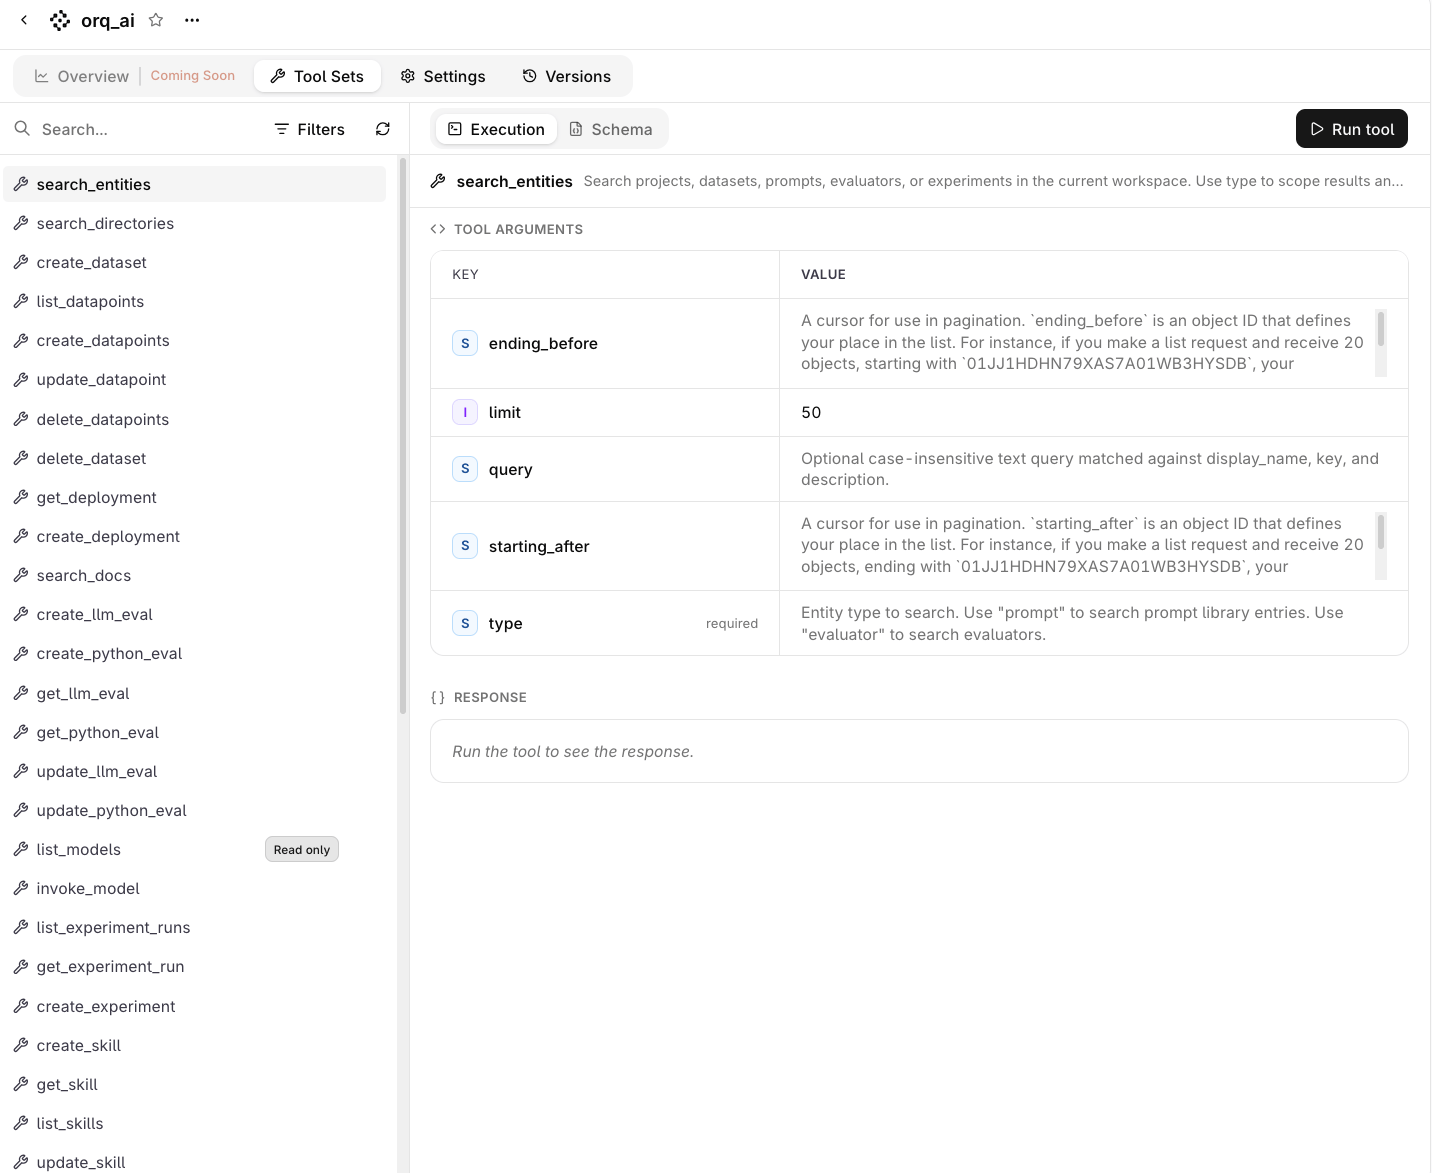
MCP Server detail page with discovered tools and execution panel
- View discovered tools in the Tool Sets tab. Select a tool to see its description, arguments, and input schema. The sync state shows the total tool count, tools added and removed since the last sync, the last synced timestamp, and any sync errors. This tab is the browser for the tools this server exposes, not a Toolset, which groups tools across servers.
- Control tool exposure when the server is linked to a gateway: select the tool checkboxes on the gateway’s MCP Servers tab (see MCP Gateways). Exposure also accepts a read-only filter in the API. It keeps only the tools the upstream server annotates as read-only (
readOnlyHint). The gateway trusts that annotation and does not check what the tool does. - Test a tool by filling in the arguments and clicking Run tool. The test invokes the tool on the upstream server and shows the response.
- Re-sync to pick up changes from the upstream server. New tools are added, removed tools are dropped.
- Configure project access in the Settings tab. Under Access control, pick All projects to share the server with the whole workspace, or Custom and set each project to Enabled or Disabled. A gateway can only link servers whose project access covers it.
- Duplicate a server to create a copy with the same connection and tool settings under a new key.
Delete a Server
Unlink the server from every MCP Gateway first: choose Remove from gateway in the server’s row menu on the gateway’s MCP Servers tab, or setclear_server_links: true on PATCH /v2/mcp-gateways/. Deleting a server that a gateway still links fails.
- AI Studio
- API & SDK
 AI Studio
Delete a server from the Delete item in the server list row menu, the Delete item in the detail page overflow menu, or the Delete Server button in the Settings form footer. Each asks for confirmation.
Monitor Usage
The Overview tab reports tool usage for the server, aggregated across every gateway that exposes it. It opens on the last 7 days, and the badge next to the heading carries the sync state, the discovered tool count, and the time of the last sync.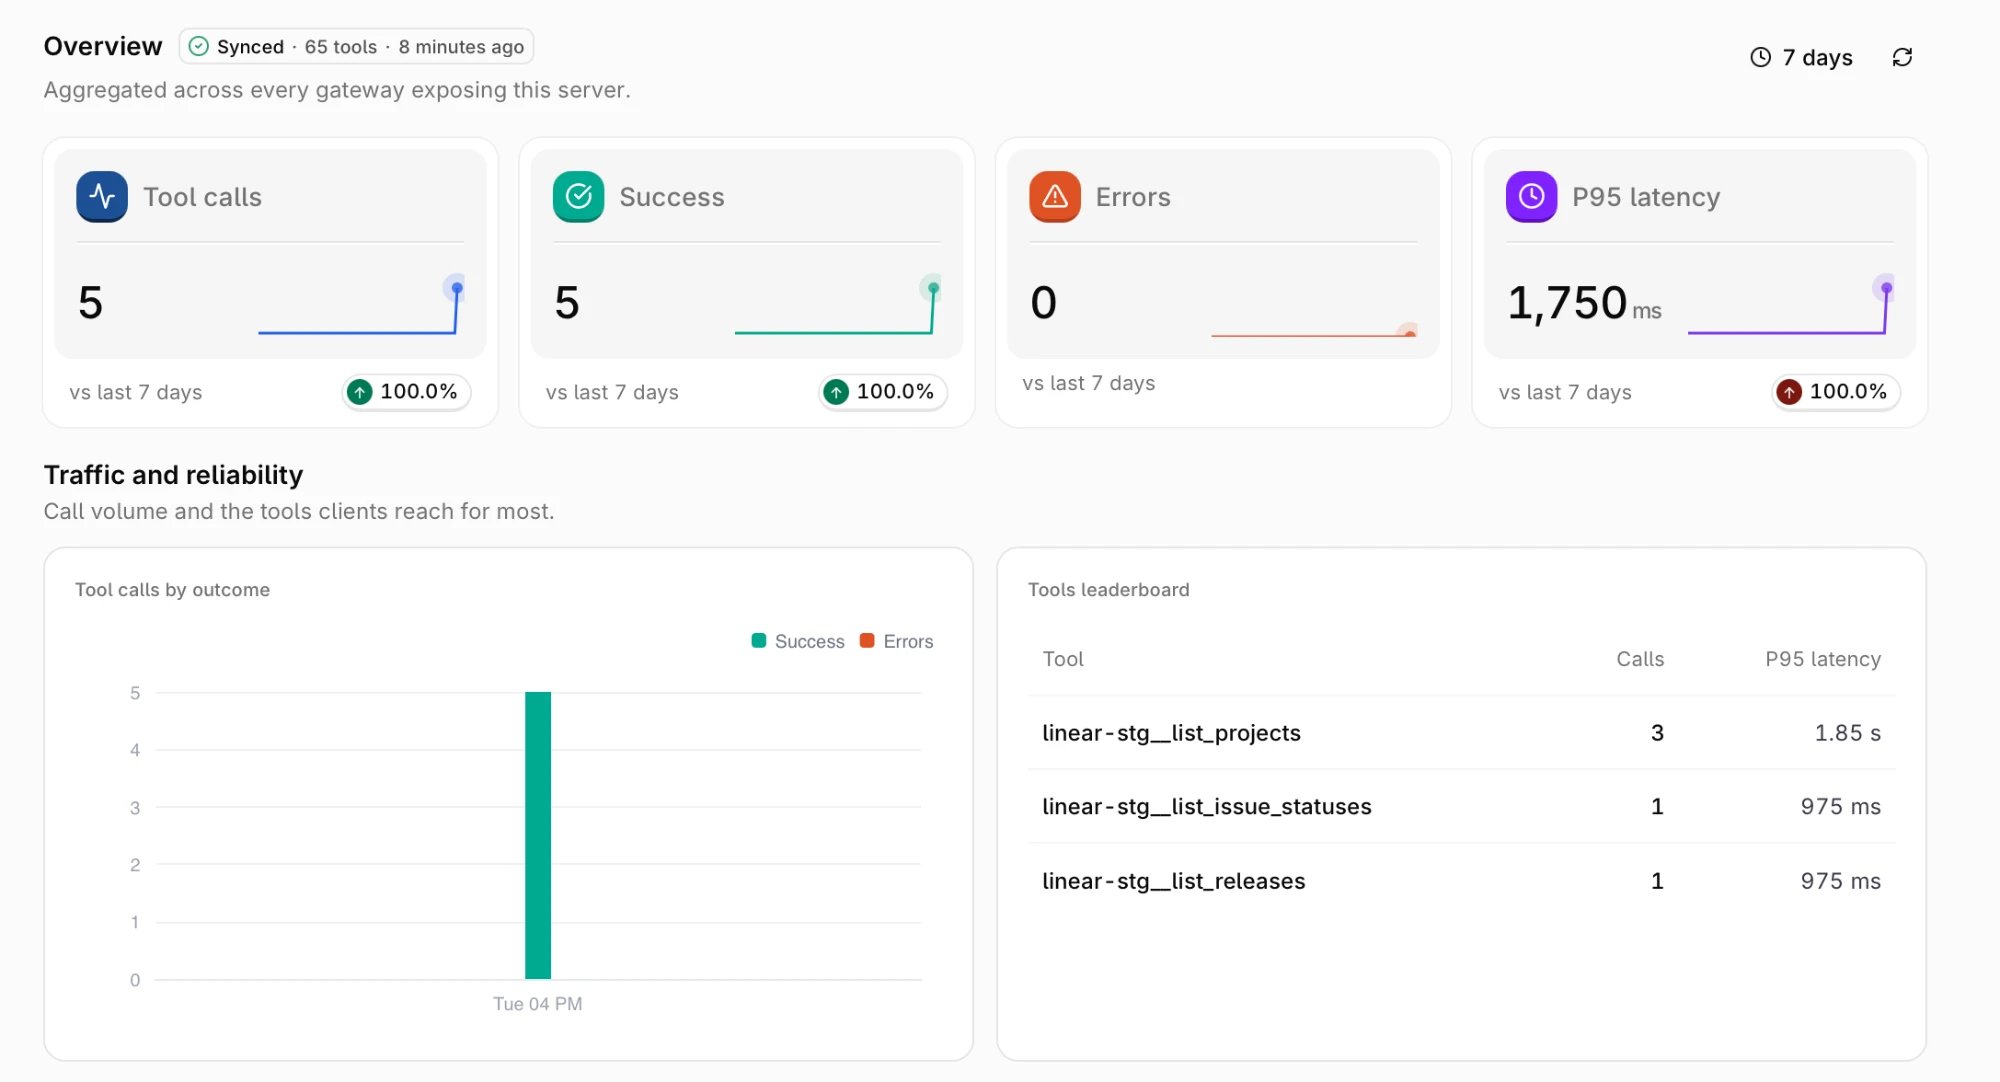
MCP Server Overview tab over the last 7 days