

Use cases
Routing rules are most useful when traffic needs to be redirected or distributed at the gateway level based on request attributes, without modifying any calling application.Swap the model for a support bot without changing any code
Swap the model for a support bot without changing any code
Intercepts support bot requests addressed to one model and silently redirects them to a cheaper one, so the calling application needs no changes to benefit from the cost saving.
Send simple and complex documents to different models
Send simple and complex documents to different models
Two rules at the same priority split document traffic by complexity: simple documents go to a lighter model, complex ones go to a more capable model, all based on metadata attached to each request.
Keep file attachment requests on models that support them
Keep file attachment requests on models that support them
Matches requests that include a file attachment and routes them through an ordered list of models that all support native file input, so the request succeeds even if the first model is unavailable.
Automatically reroute traffic when a provider goes down
Automatically reroute traffic when a provider goes down
A low-priority catch-all rule that redirects traffic to an alternative set of models whenever primary providers are unavailable, keeping requests flowing without manual intervention.
Spread load evenly across multiple endpoints for the same model
Spread load evenly across multiple endpoints for the same model
Distributes requests in round-robin mode across multiple endpoints serving the same model, balancing inference load across providers without any changes required on the caller side.
How routing rules work
When a request arrives at the AI Gateway, the AI Gateway evaluates all active routing rules in ascending priority order. The first rule whose CEL expression matches the request determines the target model. If no rule matches, the model from the original request payload is used. Example: A request arrives withmodel: "openai/gpt-5.6-sol". A routing rule with condition model.contains("gpt-5.6-sol") and target openai/gpt-5.4-mini is the highest-priority matching rule. The AI Gateway redirects the request to gpt-5.4-mini, regardless of what the caller specified. In CEL expressions, model refers to the model value from the request payload.
See also: Request-level load balancing
To distribute traffic across providers at the request level without organization-wide rules, use the
load_balancer parameter directly in your API calls.Visibility
- Visible to workspace administrators only.
Creating a routing rule
From the Routing Rules list, click Routing Rule. The form opens as a full page with a back control and an unsaved-changes confirmation. It carries five sections, and the submit button reads Create Rule, or Save Changes once the rule exists.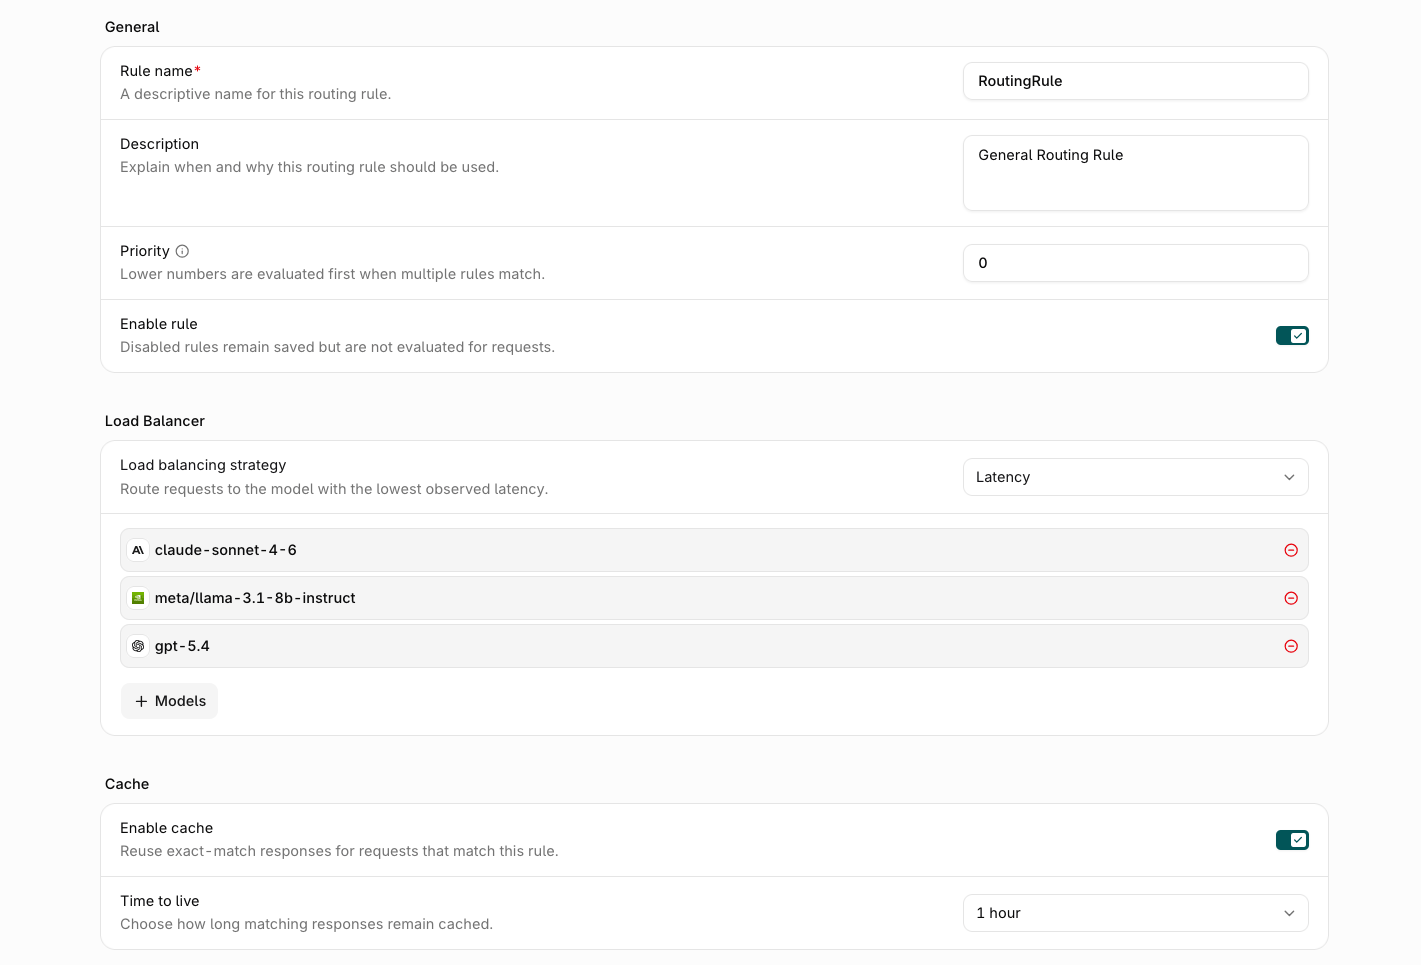
The top of the Create Routing Rule form with the General fields, a Latency strategy under Load Balancer, and the Cache section.
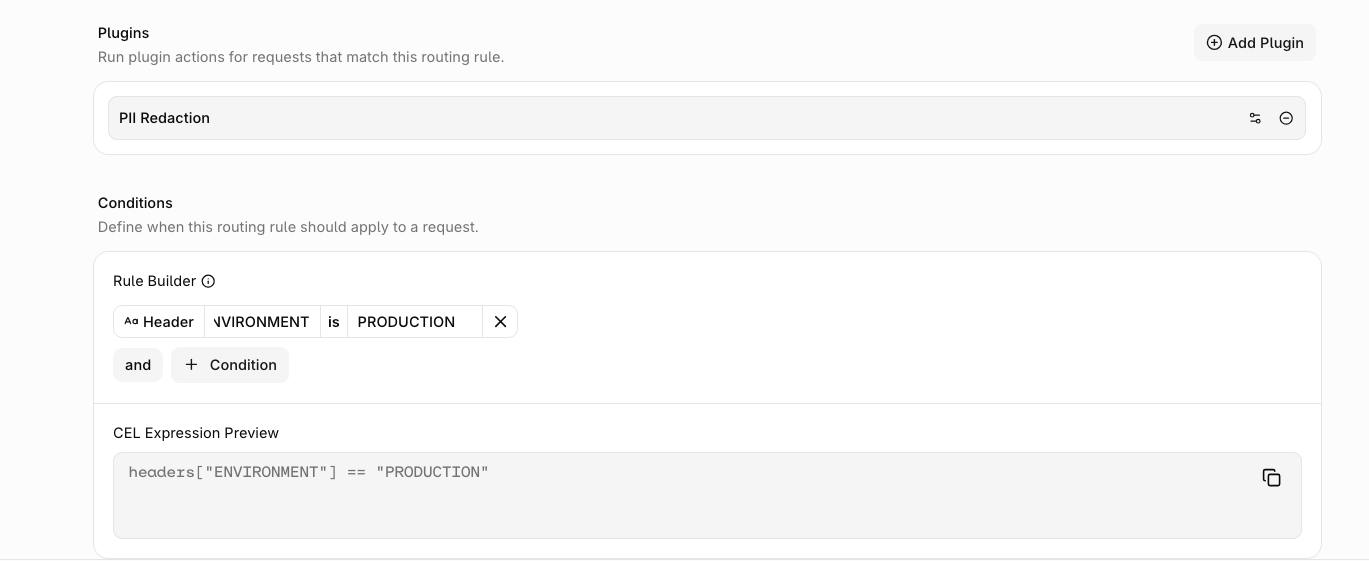
The bottom of the Create Routing Rule form with the Plugins and Conditions sections.
General
Load Balancer
Optional. Defines the target model or models to route matching requests to. Leave this section empty to build a rule that exists only to apply a plugin or a cache to matched traffic, with no model routing at all. Load balancing strategy sets how the targets are used:- Fallback: Route to the primary model. If it fails, try the next in the list.
- Latency: Route to the model with the lowest recently observed latency. See Latency-based routing for the full selection algorithm.
- Weighted: Split traffic across models by percentage weights.
- Round Robin: Rotate evenly across all configured models.
Cache
Optional. Give the rule its own response cache for matching requests. Exact-match requests reuse a cached response instead of hitting a model. Leaving this section disabled adds no cache of its own, so matched requests keep using their request-levelcache setting.
Set Enable cache to turn the cache on, then choose Time to live to control how long matching responses stay cached, from 5 minutes up to 3 days. The default is 1 hour.
When a rule has cache enabled, a matching request uses the rule’s cache configuration instead of the request’s own cache parameter; the two are not merged. See LLM response caching for how caching works.
Plugins
Optional. Attach plugins that run on traffic matching this rule. Plugins can transform the request, the response, or stored traces. Click Add Plugin to attach one of the following:Conditions
Define when this routing rule should apply to a request. The Rule Builder constructs the CEL expression that determines whether this rule applies to a given request. Conditions are built from values present in the request headers and body. Clicking Condition opens a dropdown with the following condition types:
Click Add group to nest conditions into a logical group. Conditions added directly to the rule are joined with
and, and conditions inside a group are joined with or; click either operator to switch it between and and or. Each condition can be removed with .
The generated CEL expression is shown read-only in the CEL Expression Preview below the builder.